
开始使用 Google 的 Page Speed API
已发表: 2019-03-11页面速度是衡量某人将在您的网站上花费多长时间的最大指标之一。 缓慢加载页面会导致更高的跳出率、更低的转化率,从而降低收入。
要深入了解加载时间是否会影响您的受众保留和转化,Google 的 Page Speed Insights 工具是一个很好的起点。 Google 的 Page Speed API 是您可以插入这些数据并在您的数据堆栈中整合洞察力的方式。 我们已经使用它来构建我们自己的 Page Speed 分析跟踪器,以监控我们客户的关键用户体验指标。
Page Speed Insights API 有什么了不起的?
使用此工具,您可以插入 URL 并接收其性能摘要。 这非常适合对少数 URL 进行采样,但如果您有一个大型网站并希望查看跨多个部分和页面类型的性能的全面概述,该怎么办?
这就是 API 的用武之地。Google 的 Page Speed Insights API 让我们有机会分析许多页面的性能并记录结果,而无需一次明确地请求一个 URL 并手动解释结果。
考虑到这一点,我们整理了一份简单的指南,帮助您开始为自己的网站使用 API。 一旦您熟悉了下面概述的过程,您将了解如何使用它来大规模分析您的站点速度,跟踪它如何随时间变化,甚至设置监控工具。
本指南假定您对脚本有一定的了解。 这里我们使用 Python 与 API 交互并解析结果。
目标
在这篇文章中,您将学习如何:
- 构建 Google Page Speed Insights API 查询
- 对 URL 表发出 API 请求
- 从 API 响应中提取基本信息
- 在 Python 中运行给定的示例脚本
设置
在使用 Python 查询 Page Speed Insights API 之前,您需要执行几个步骤。
- API 设置:许多 Google API 需要 API 密钥、密码和其他身份验证措施。 但是,您不需要任何这些即可开始使用 Google Page Speeds API!
- Python 3 安装:如果您以前从未使用过 python,我们建议您开始使用 Anaconda 发行版(Python 3.x 版本),它安装了 python 以及 Pandas 等流行的数据分析库。
提出请求
请求的基础
可以使用 GET 请求在此端点查询 API:
GET https://www.googleapis.com/pagespeedonline/v5/runPagespeed然后我们添加额外的参数来指定我们想要查找页面速度的 URL 和要使用的设备类型,如下所示:
https://www.googleapis.com/pagespeedonline/v5/runPagespeed?url={url}&strategy={device_type} 发出请求时,您应将{url}替换为您网站中的 URL 编码页面 URL,并将{device_type}替换为移动设备或桌面设备,以指定设备类型。
Python 包
为了发出请求,摄取它们,然后将结果写入表,我们将使用一些 python 库:
- urllib :发出 HTTP 请求。
- json :解析和读取响应对象。
- pandas :以 CSV 格式保存结果。
构造查询
要使用 Python 发出 API 请求,我们可以使用urllib.request.urlopen方法:
import urllib.request import urllib.parse url = 'http://www.example.com' escaped_url = urllib.parse.quote(url) device_type = 'mobile' # Construct request url contents = urllib.request.urlopen( 'https://www.googleapis.com/pagespeedonline/v5/runPagespeed?url={}&strategy={}' .format(escaped_url, device_type) ).read().decode('UTF-8')这个请求应该返回一个(非常大的)JSON 响应。 我们将在稍后更详细地讨论这个问题。
进行多个查询
这个 API 的一个主要卖点是它使我们能够为批量 URL 拉取页面速度。 让我们看一下如何使用 Python 完成此操作。
一种选择是将请求参数( url和device_type )存储在 CSV 中,我们可以将其加载到 Pandas DataFrame 中进行迭代。 请注意,每个请求或唯一的url + device_type对都有自己的行。
以 CSV 格式存储数据
URL, device_type 0, https://www.example.com, desktop 1, https://www.example.com, mobile 2, https://www.example.com/blog, desktop 3, https://www.example.com/blog, mobile加载 CSV
import pandas as pd df = pd.read_csvimport pandas as pd df = pd.read_csv(url_file)
一旦我们有了一个包含所有要请求的 URL 的数据集,我们就可以遍历它们并为每一行发出 API 请求。 如下所示:
import time # This is where the responses will be stored response_object = {} # Iterating through df for i in range(0, len(df)): # Error handling try: print('Requesting row #:', i) # Define the request parameters url = df.iloc[i]['URL'] device_type = df.iloc[i]['device_type'] # Making request contents = urllib.request.urlopen( 'https://www.googleapis.com/pagespeedonline/v5/runPagespeed?url={}&strategy={}' .format(url, device_type) ).read().decode('UTF-8') # Converts to json format contents_json = json.loads(contents) # Insert returned json response into response_object response_object[device_type][url] = contents_json print('Sleeping for 20 seconds between responses.') time.sleep(20) except Exception as e: print('Error:', e) print('Returning empty response for url:', url) response_object[device_type][url] = {}阅读回复
在对数据应用任何过滤器或格式化之前,我们可以首先存储完整的响应以供将来使用,如下所示:
import json from datetime import datetime f_name ='data/{}-response.json'.format(datetime.now().strftime("%Y-%m-%d_%H:%M:%S")) with open(f_name, 'w') as outfile: json.dump(response_object, outfile, indent=4)如上所述,每个响应都返回一个 JSON 对象。 它们具有与给定 URL 相关的许多不同属性,并且在不过滤和格式化的情况下太大而无法破译。
为此,我们将使用 Pandas 库,它可以轻松地以表格格式提取我们想要的数据并导出为 CSV。
这是响应的一般结构。 由于其大小,有关加载时间的数据已被最小化。

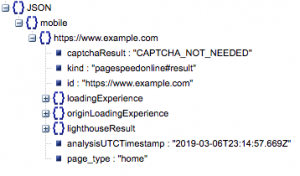
一般响应结构
除其他信息外,响应中包含两个主要的页面速度数据来源:实验室数据,存储在“lighthouseResult”中;字段数据,存储在“loadingExperience”中。 在这篇文章中,我们将只关注 Field 数据,这些数据是根据 Chrome 浏览器上的真实用户众包获取的。
特别是,我们将提取以下指标:
- 请求的 URL 和最终 URL
- 我们需要经过审核的请求 URL 和最终解析 URL,以确保它们相同。 这将帮助我们确定结果来自预期的 URL 而不是重定向。
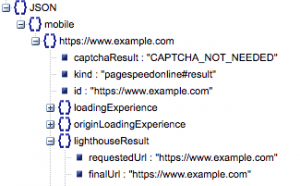
我们可以在上面的“lighthouseResult”中看到两个 URL 是相同的。
- 首次内容绘制(毫秒)
- 这是用户第一次导航到页面和浏览器第一次呈现一段内容之间的时间,告诉用户页面正在加载。
- 该指标以毫秒为单位。
- First Contentful Paint (慢、平均、快的比例)
- 这显示了 First Contentful Paint 加载时间缓慢、平均和快速的页面百分比。
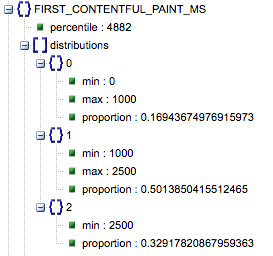
第一个 Contentful Paint 加载时间(以毫秒为单位),标记为“百分比”,以及慢速、平均和快速的比例。
所有这些结果都可以为移动和桌面数据中的一个或两个提取。
如果我们将 Pandas 数据框称为 df_field_responses,我们将通过以下方式提取这些属性:
import pandas as pd # Specify the device_type (mobile or desktop) device_type = 'mobile' # Create dataframe to store responses df_field_responses = pd.DataFrame( columns=['requested_url', 'final_url', 'FCM_ms', 'FCP_category', 'FCP_fast', 'FCP_avg', 'FCP_slow' ] ) for (url, i) in zip( response_object[device_type].keys(), range(0, len(df_field_responses)) ): try: print('Trying to insert response for url:', url) # We reuse this below when selecting data from the response fcp_loading = response_object[device_type][url] ['loadingExperience']['metrics']['FIRST_CONTENTFUL_PAINT_MS'] # URLs df_field_responses.loc[i, 'requested_url'] = response_object[device_type][url]['lighthouseResult']['requestedUrl'] df_field_responses.loc[i, 'final_url'] = response_object[device_type][url]['lighthouseResult']['finalUrl'] # Loading experience: First Contentful Paint (ms) df_field_responses.loc[i, 'FCP_ms'] = fcp_loading['percentile'] df_field_responses.loc[i, 'FCP_category'] = fcp_loading['category'] # Proportions: First Contentful Paint df_field_responses.loc[i, 'FCP_fast'] = fcp_loading['distributions'][0]['proportion'] df_field_responses.loc[i, 'FCP_avg'] = fcp_loading['distributions'][1]['proportion'] df_field_responses.loc[i, 'FCP_slow'] = fcp_loading['distributions'][2]['proportion'] print('Inserted for row {}: {}'.format(i, df_field_responses.loc[i])) except Exception as e: print('Error:', e) print('Filling row with Error for row: {}; url: {}'.format(i, url)) # Fill in 'Error' for row if a field couldn't be found df_field_responses.loc[i] = ['Error' for i in range(0, len(df_field_responses.columns))]然后将数据帧 df_field_responses 存储在 CSV 中:
df_field_responses.to_csv('page_speeds_filtered_responses.csv', index=False)在 GitHub 上运行脚本
GitHub 上的存储库包含有关如何运行文件的说明,但这里有一个快速细分。
- 在 GitHub 上运行示例脚本之前,您需要使用克隆存储库
git clone https://github.com/Ayima/page-speed-blog-post.git
- 然后创建一个包含要查询的 URL 的 CSV 文件。
- 使用 URL 文件名填写配置文件。
- 运行脚本的命令:
python main.py --config-file config.json要记住的事情:
API 对您每天和每秒可以发出的请求数有限制。
有几种方法可以为此做好准备,包括:
- 错误处理:重复请求返回错误
- 限制:在您的脚本中限制每秒发送的请求数,并在 URL 失败时重新请求。
- 如有必要,获取 API 密钥(通常是在您每秒进行一次以上查询的情况下)。
希望在阅读完本指南后,您能够开始使用 Google Page Speed Insights API 的一些基本查询。 如有任何问题或遇到任何问题,请随时通过推特@ayima 联系我们!
我们如何在 Ayima 使用 Page Speeds API
在 Ayima,我们不断为客户收集和存储页面速度。 这有助于我们密切关注他们网站的健康状况并识别负面或正面趋势。 通过监控各种页面的速度,我们能够按站点部分或页面类型(例如电子商务网站的产品页面 VS 类别页面)可视化性能。

我们还跟踪 API 提供的其他有趣指标,包括 Google 的实验室数据,并在交互式仪表板中显示所有内容。 有关这方面的更多信息,请与我们联系,我们很乐意与您聊天!
源代码:您可以在此处找到带有示例脚本的 GitHub 项目以运行。