
オンラインストアのセットアップ:新しいストアを立ち上げて稼働させるためにあなたがしなければならない12のこと
公開: 2021-08-15それで、あなたは新しいオンラインストアのセットアップの骨組みを手に入れました…さて、何ですか?
すべての新しいeコマース起業家はこの段階を経ています。実際にウェブサイトを設定する方法を理解しましたが、ここからどこに行きますか? セットアッププロセスのこの時点で、失われ、圧倒された新しい起業家がどのように感じているかを知っているので、この投稿では、新しいオンラインストアを正しくセットアップするために必要な12のことを説明します。
これらの12の設定を行うことで、将来、より優れた、より専門的で、より効率的なオンラインストアを運営できるようになります。今すぐ時間をかけて、それらを実践してください。 あなたがやったことをうれしく思います! それらは確かにオンラインビジネスを立ち上げることの魅力的な側面ではありませんが、それでも不可欠で実用的です。
さっそく始めましょう。
セットアップする
GoogleAnalyticsを設定する
オンラインストアを持つことは素晴らしいことですが、あなたが勘と当て推量だけで運営しているならそれは良くありません。 Google Analyticsは、オンラインストアに対する強力で柔軟な洞察を提供し、意思決定を強化するためのデータ駆動型の指標を提供します。
Google Analyticsは、Webプレゼンス(この場合はオンラインストア)に接続できるツールであり、Webページ、訪問者、および訪問者の行動に関する分析を提供します。 インサイトの表示を開始するには、Google Analyticsを設定し、データを収集する時間が必要です。 そのため、セットアップが早ければ早いほど、メリットを享受し始めることができます。
なぜそれが重要なのか
ほとんどのeコマースプラットフォームには独自の種類の分析が実装されていますが、Google Analyticsが提供できるものに近いものはありません。そして何より、無料です。 それはそれをすべてのオンラインストアの所有者にとって簡単な必需品にします。
Google Analyticsを使用すると、顧客がどこから来ているか(ヒント:これらの領域にもっと焦点を合わせる必要があります!)、最も人気のある製品、訪問者の人口統計、最も訪問されているWebページを確認できます。 、その他多数。
データオプションは無限であり、Google Analyticsを完全に把握することは生涯にわたる取り組みであり、少し学習曲線がありますが、最も基本的な洞察でさえ、あなたとあなたの店にとって非常に役立つ可能性があります。 さらに、Google Analyticsを今すぐ実装することも重要です。ストアが成長し、それを売却するか、投資家に資金提供を依頼するかを決定したときに、最初に確認したいのはGoogleAnalyticsデータです。 これは、ビジネスの重要な指標を確認するためにすべてのプラットフォームで使用される業界標準のツールです。そのため、自分の指標を追跡できるように設定してください。
始める方法
Google Analyticsアカウントの設定は誰にとっても同じですが、オンラインストアへの接続は、使用しているプラットフォームによって異なります。
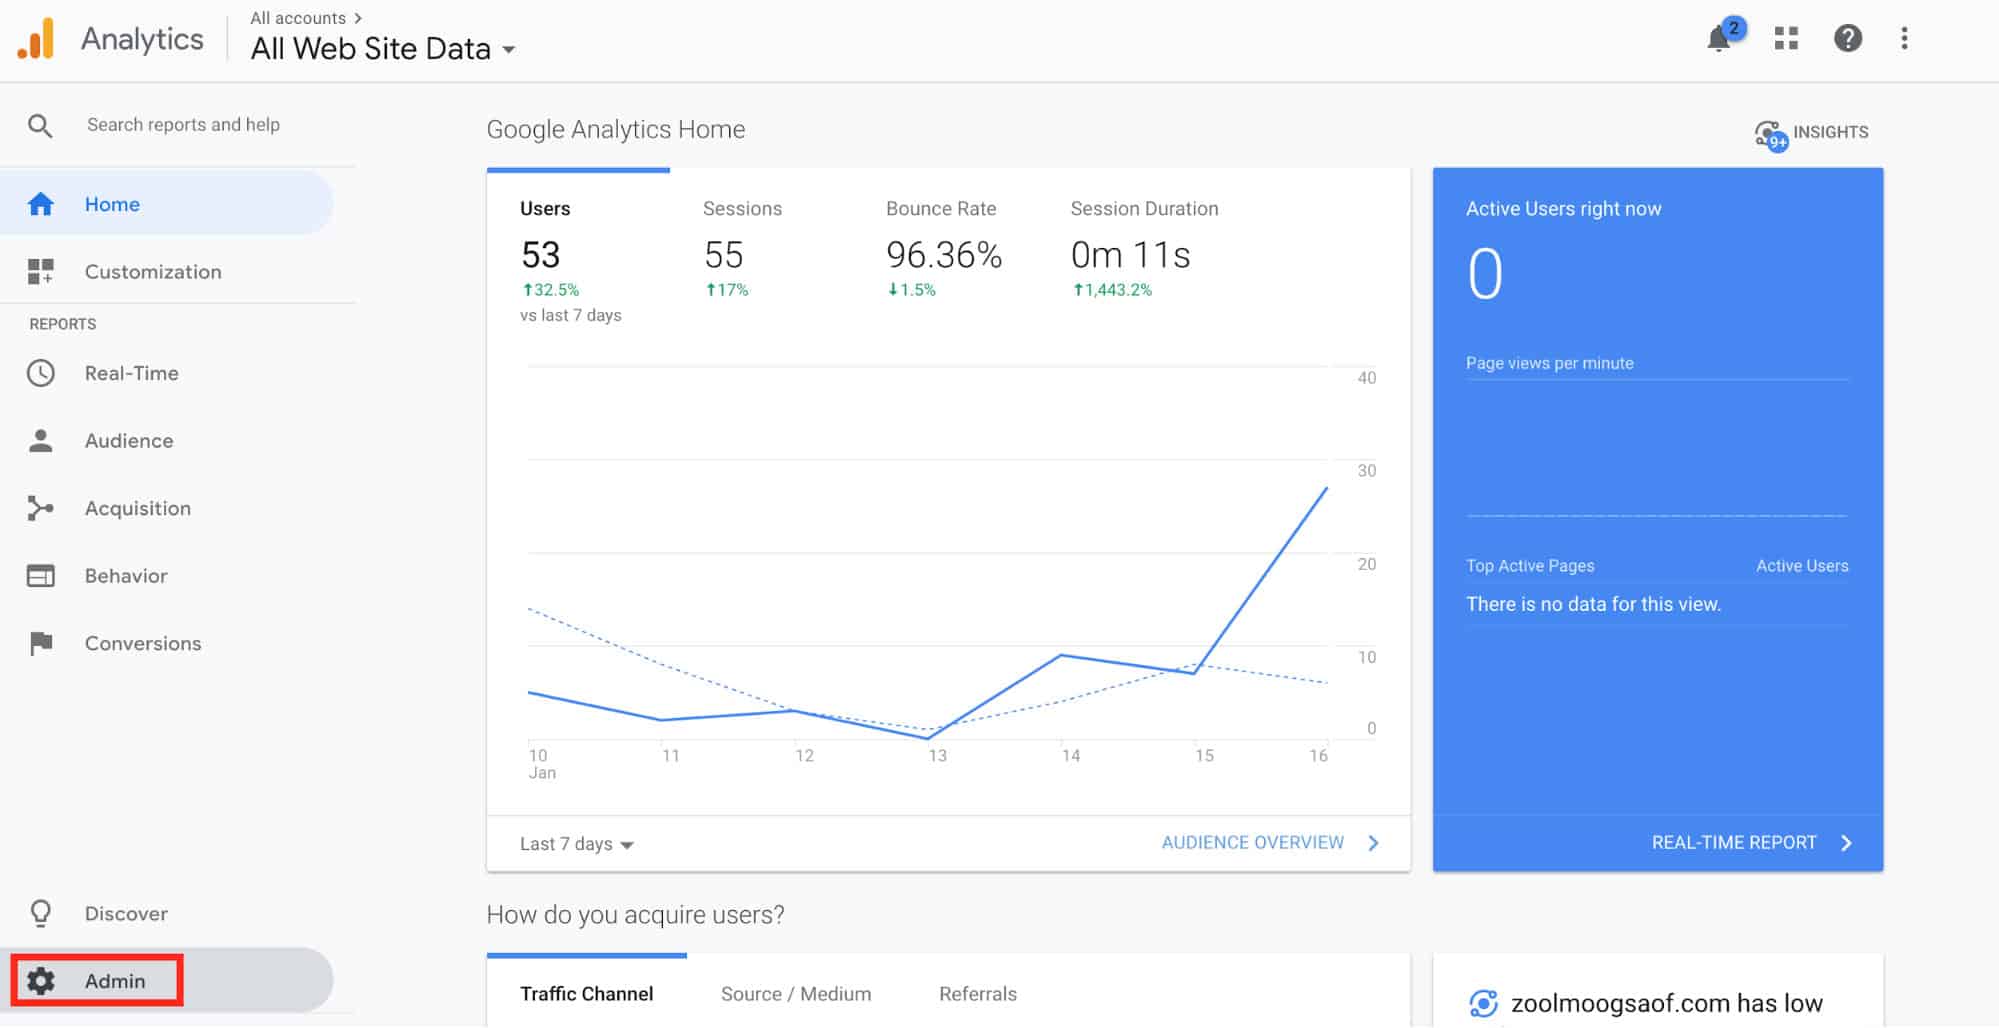
最初のステップは、GoogleAnalyticsに移動することです。 そこで、Gmailアカウントでログインする必要があります。
歯車アイコンの横にある左下隅の「管理者」をクリックします。
[アカウント]列で、プロパティを配置するためのアカウントを作成します(または、既存のアカウントを既に持っている場合は選択します)。
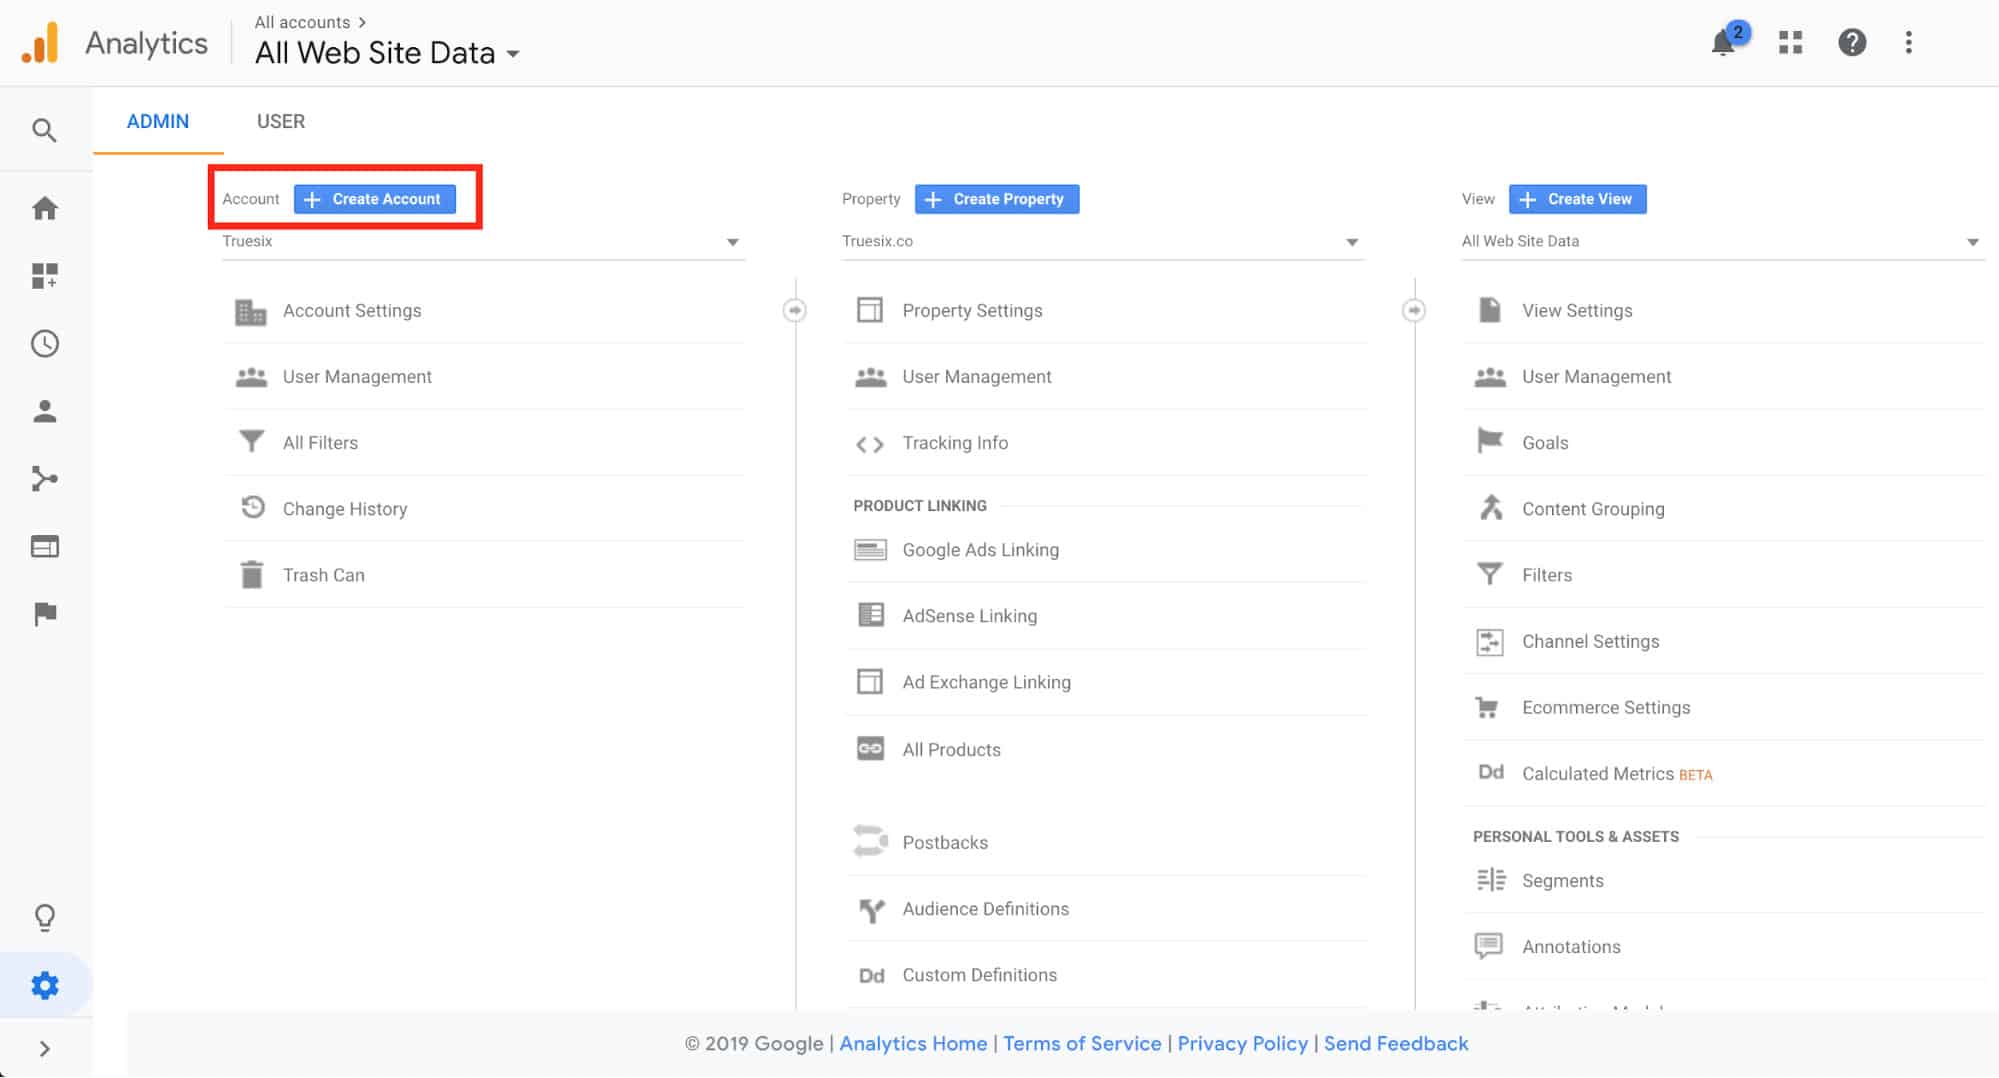
[プロパティ]列で、[新しいプロパティを作成]をクリックします。
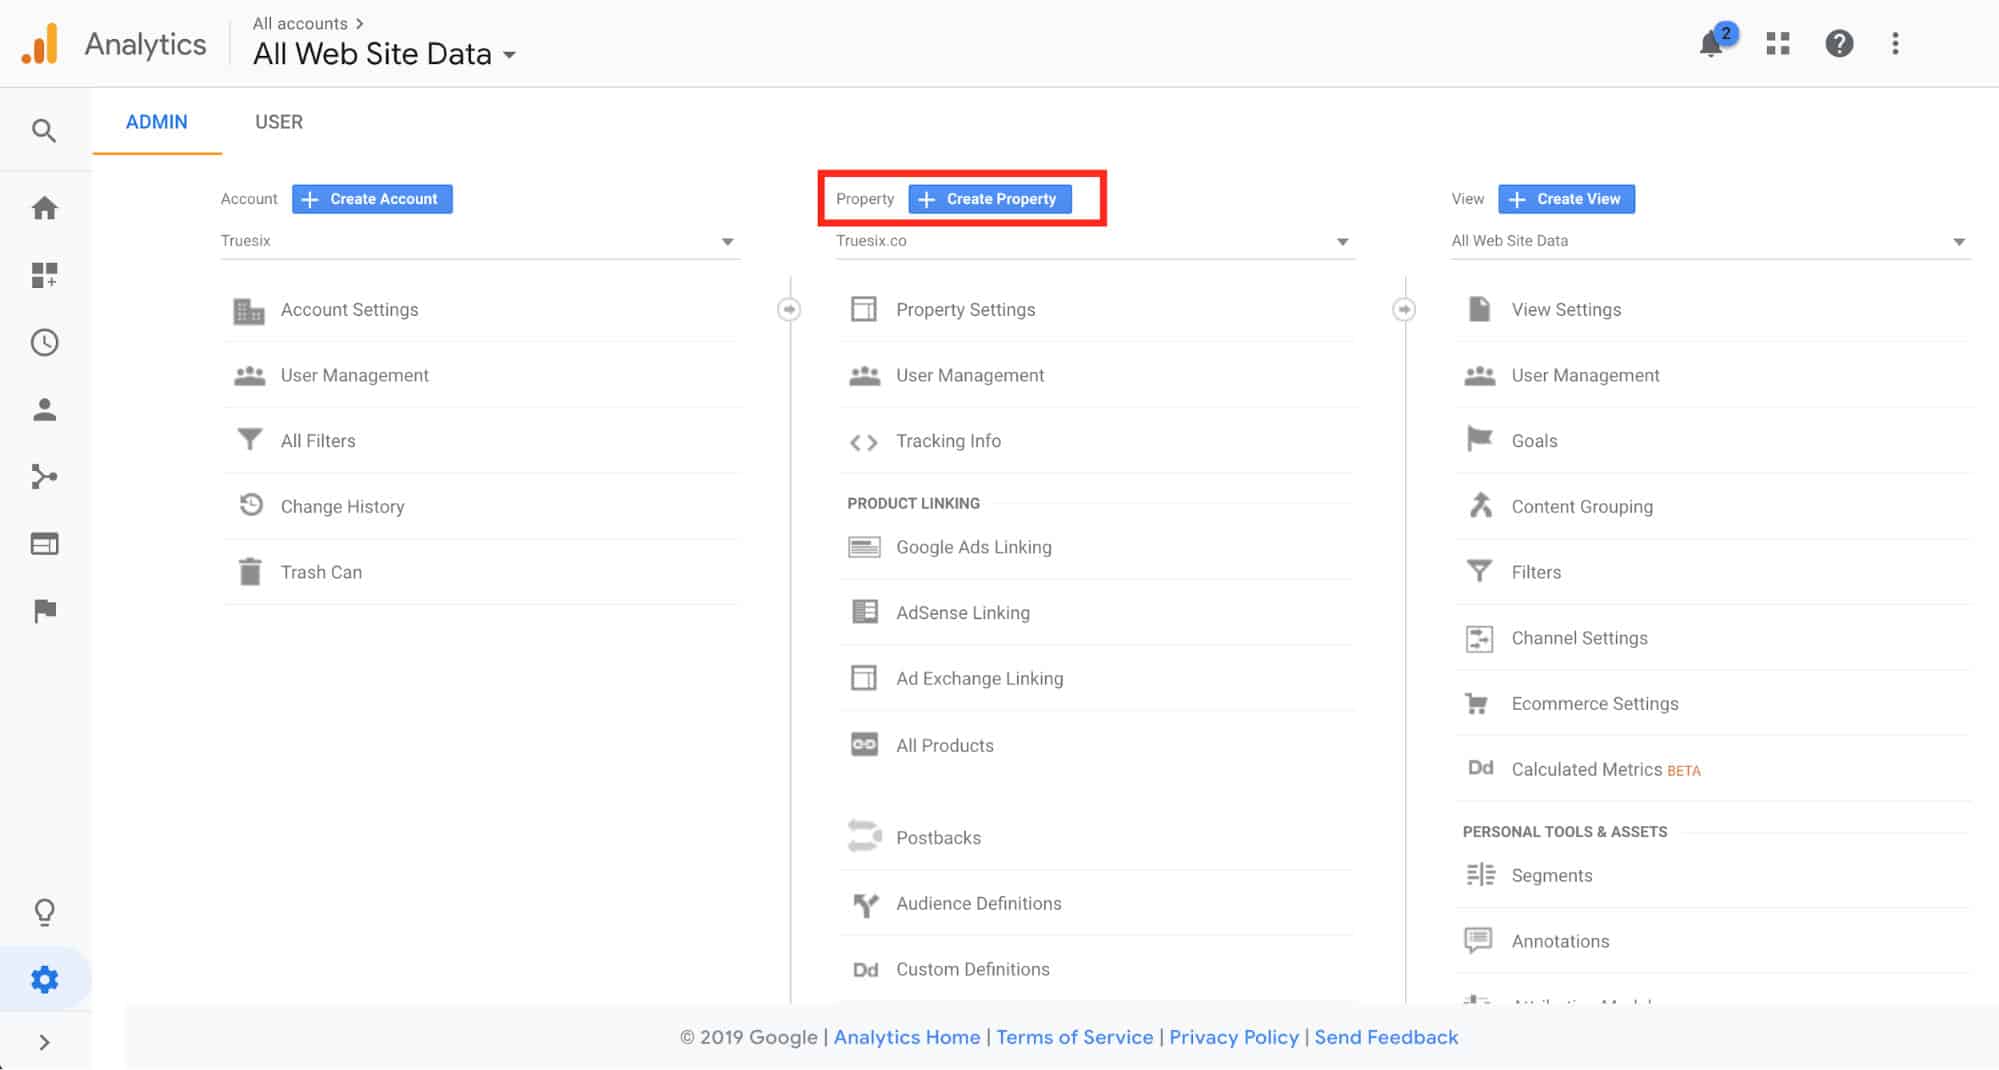
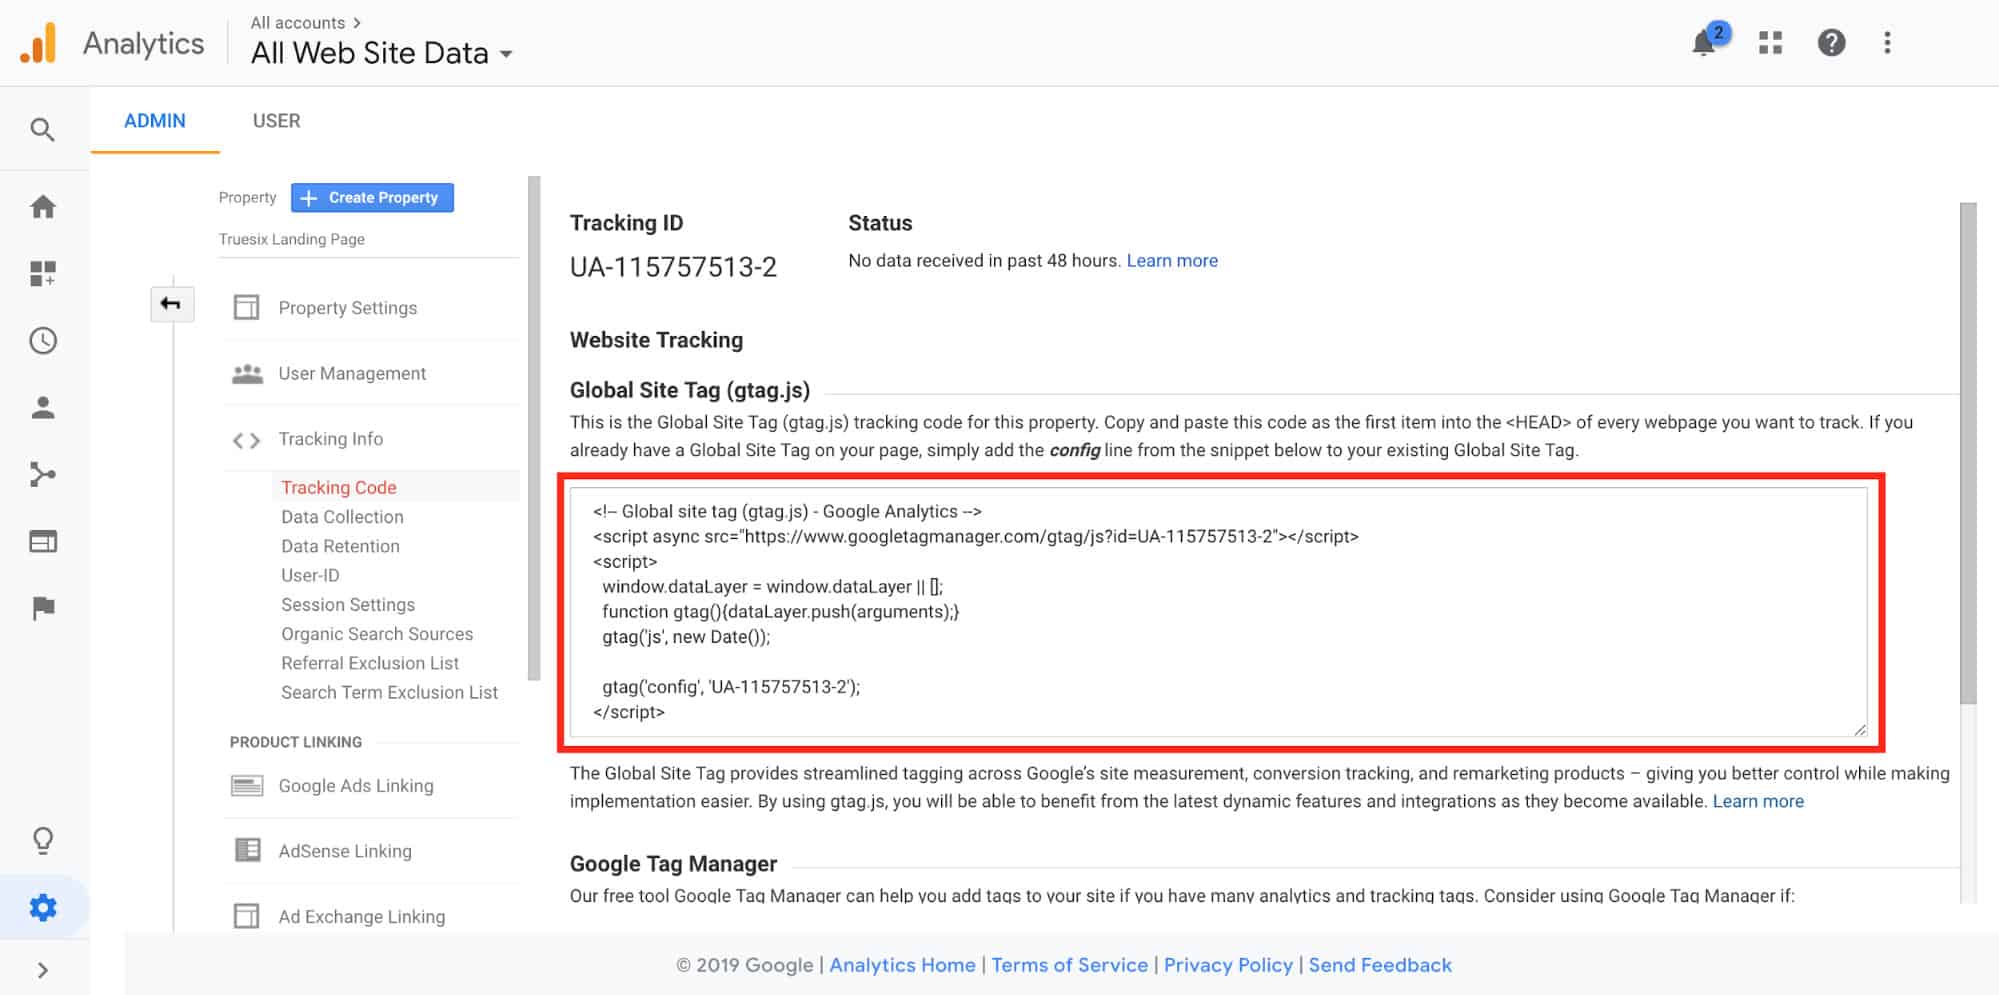
プロパティの名前(自分だけに表示されます)、WebサイトのURL、タイムゾーンなど、尋ねられたデータを入力し、[追跡IDを取得]をクリックします。
使用するeコマースプラットフォームに応じて、ストアをアカウントに接続します。 ほとんどのプラットフォームでは、トラッキングIDをそのプラットフォームの設定のウィンドウに貼り付けるだけです。 Google AnalyticsをShopifyストアに接続する方法、Google AnalyticsをBigCommerceストアに接続する方法、およびGoogleAnalyticsをWooCommerceストアに接続する方法の詳細についてはこちらをご覧ください。
もう一度[管理](歯車のアイコンが付いた左下隅)に移動し、[表示]列の下の[設定の表示]をクリックして、eコマース設定を有効にします。
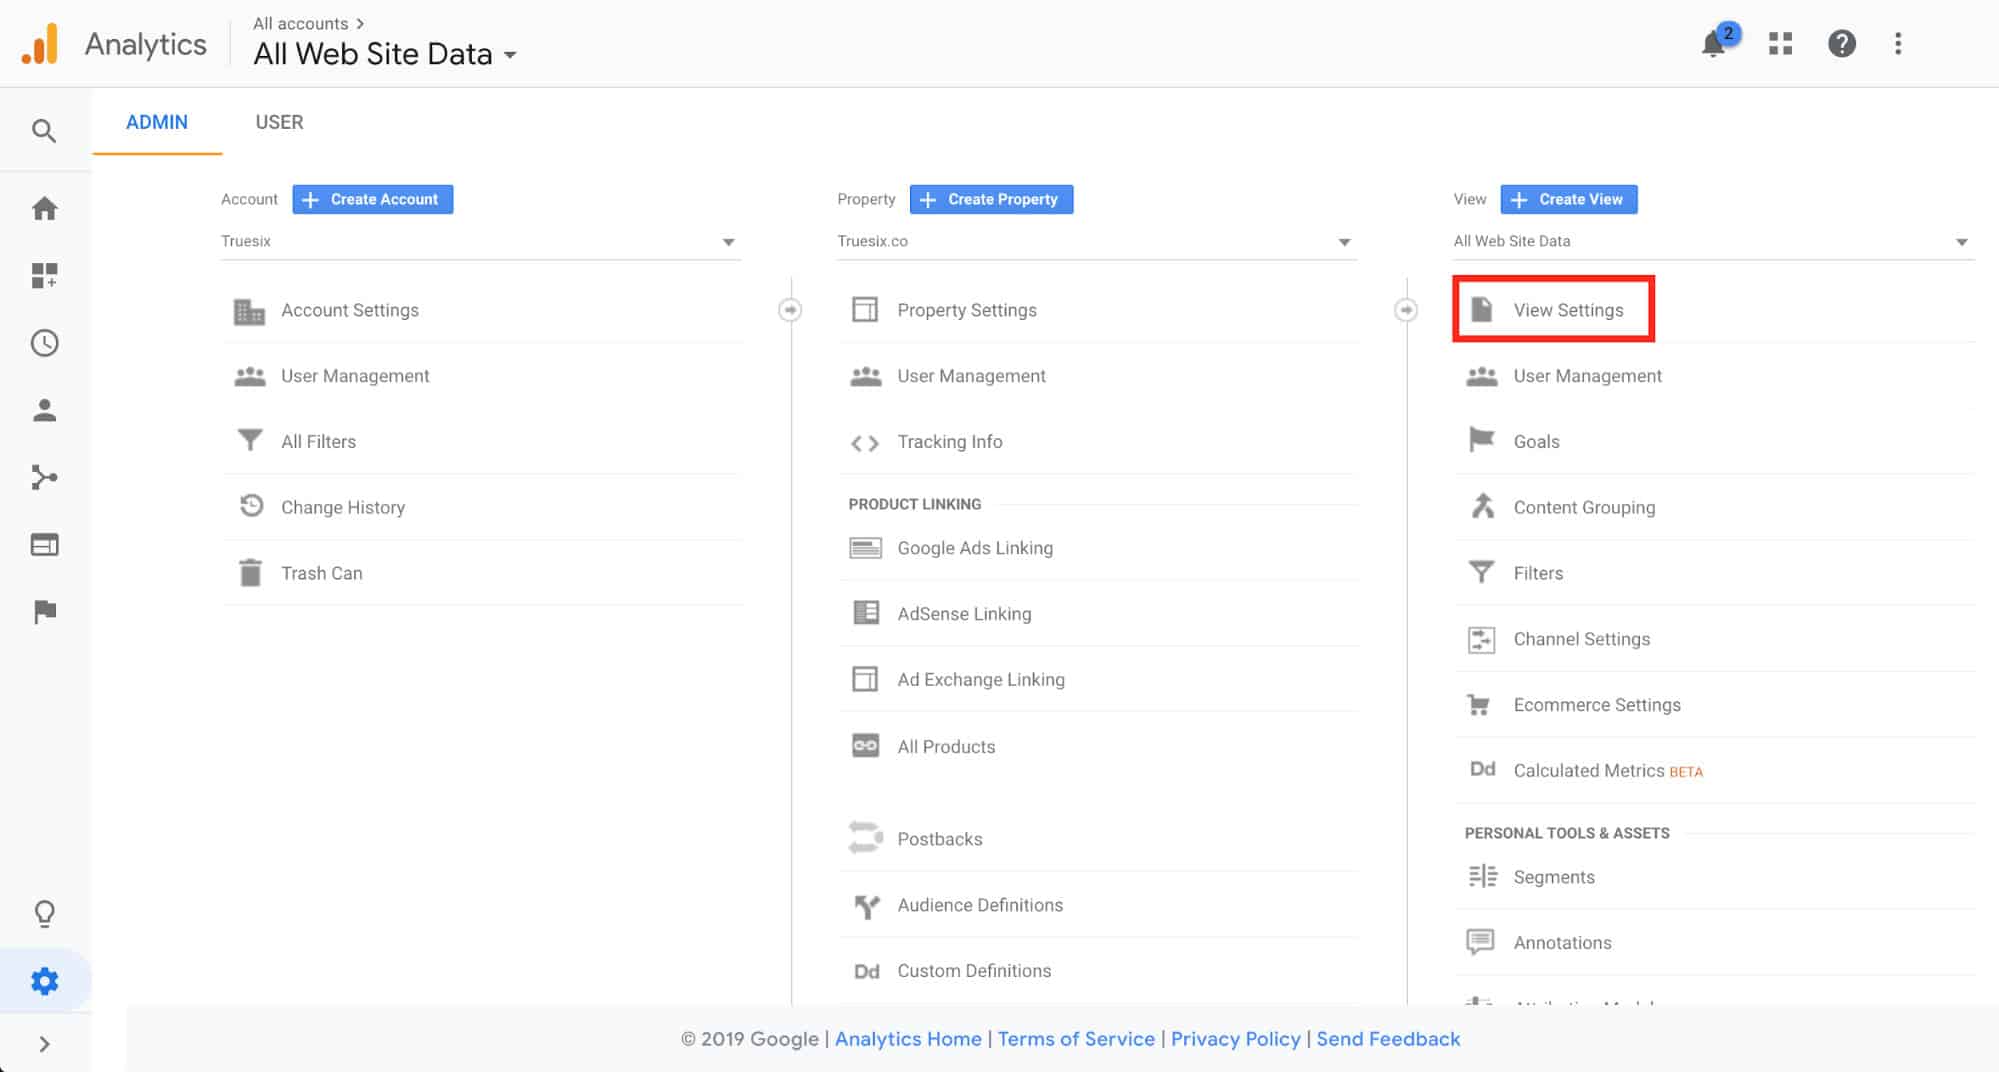
左側の[ eコマース設定]タブを選択して、 [eコマース設定]セクションにアクセスします。
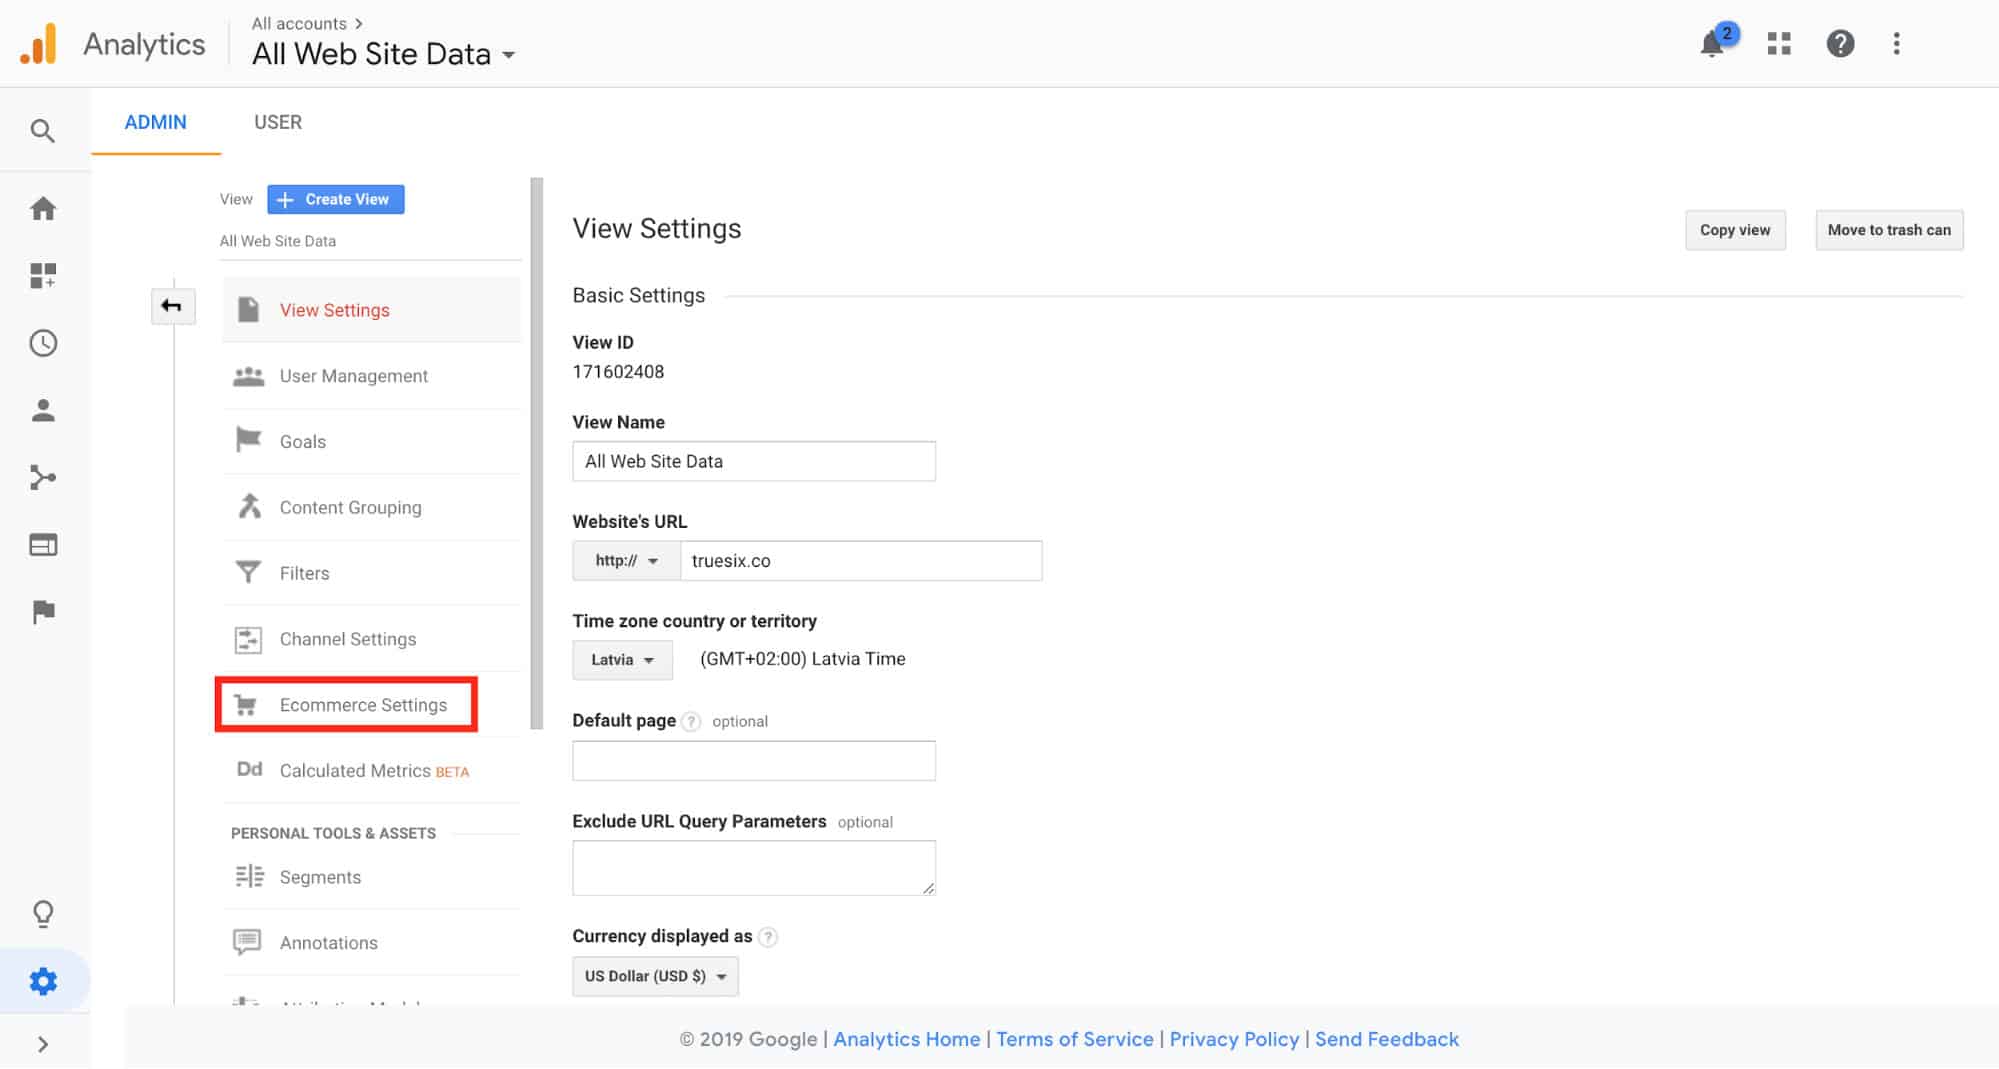
[ eコマースを有効にする]ボタンを[オン]に切り替え、[次のステップ]、[送信]の順にクリックします。

これで、販売された商品の数など、ストアのアクティビティを追跡する完全に機能するGoogleアナリティクスアカウントが作成されます。
推奨リソース
- Googleによるアナリティクスの使用を開始する
- PrintfulによるeコマースのためのGoogleAnalyticsのビギナーズガイド
- MozによるGoogleAnalyticsの絶対初心者ガイド
- GoogleAnalyticsをShopifyストアに接続します
- GoogleAnalyticsをBigCommerceストアに接続します
- GoogleAnalyticsをWooCommerceストアに接続します
おすすめのアプリ
- グーグルアナリティクス
Google検索コンソールとBingウェブマスターツールを設定する
Google検索コンソールとBingWebmaster Toolsは、検索でのサイトのパフォーマンスを評価および改善するのに役立つ無料のサービスです。 ウェブマスターツールの助けを借りて、あなたは次のようなものを見ることができます:
- 検索エンジンでのストアの全体的なパフォーマンス
- 最高のパフォーマンスのページ
- エラーのあるページ(404エラー、クロールとインデックス作成の問題など)
- あなたの店がランク付けしている上位の検索クエリ
- また、サイトに問題やエラーがあり、検索エンジンに表示されている場合に、GoogleとBingから連絡を受ける方法でもあります。
あなたのウェブサイトがどのように機能しているか、そしてその弱点を知ることによって、あなたは問題を修正し、検索エンジンであなたの店の可視性を高めることができます。
なぜそれが重要なのか
毎日、人々はGoogleで56億回の検索を実行し、Bingで873万回の検索を実行しています。 あなたの店が彼らの要件を満たしていないか、あなたのページにエラーがあるか、そして/またはクロールできない場合、それはあなたが失っているオーディエンスです。
ウェブマスターツールは、問題がどこにあるのか、何がランキングに悪影響を及ぼしているのかを正確に示すことで、ウェブサイトを健全な状態に保つのに役立ちます。 これらのツールはまた、あなたがすでに良い仕事をしている場所を示し、あなたがさらに高いランキングのためにあなたの店をさらに最適化することができるようにします。
始める方法
ステップ1:ウェブサイトをGoogle検索コンソールに追加する
Google検索コンソールに移動し、Gmailアカウントでログインします。 次に、検索ドロップダウンの下にある[プロパティの追加]をクリックします。
広告

ストアのURLを入力し、[続行]をクリックします。

これで、セクション1「GoogleAnalyticsの設定」でストアに既に接続している場合、Webサイトは自動的に検証されます。 まだ行っていない場合は、Shopify、BigCommerce、およびWooCommerceの次の手順に従ってストアを確認できます。
ストアのサイトマップをアップロードしてセットアップを完了します。 Shopify、BigCommerce、およびWooCommerceのサイトマップURLを見つける方法を学びます。 サイトマップのURLを取得したら、 「サイトマップ」に移動して送信します。
ステップ2:WebサイトをBingWebマスターツールに追加する
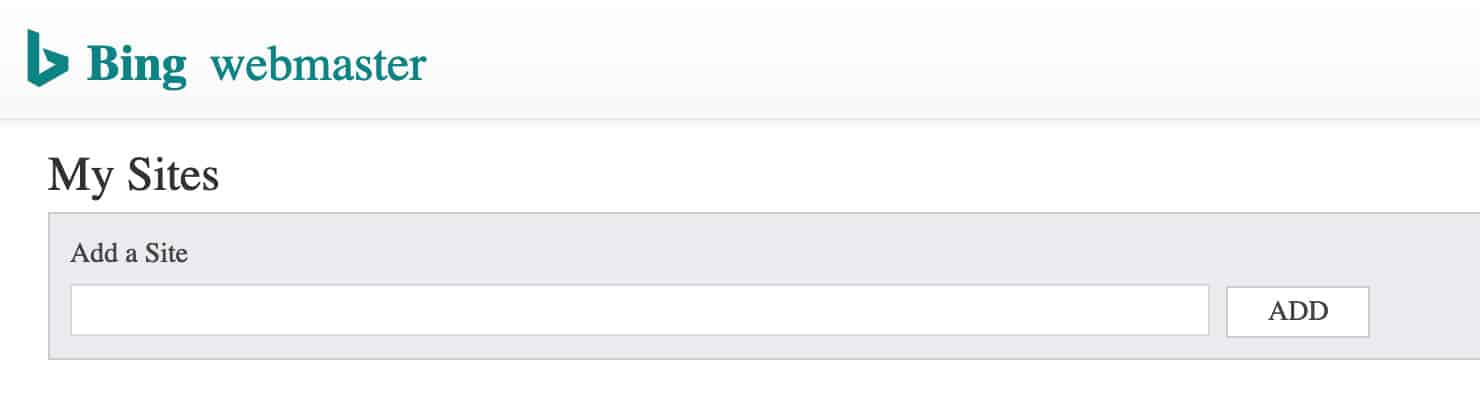
Bing Webmaster Toolsに移動し、Outlook、Gmail、またはFacebookアカウントでサインアップします。 ウェブサイトを追加するには、 「個人用サイト」に移動し、ストアのURLを入力して、 「追加」をクリックします。
次に、ストアのサイトマップを追加し(Google検索コンソールの場合と同じ方法で見つけます)、[追加]をクリックします。

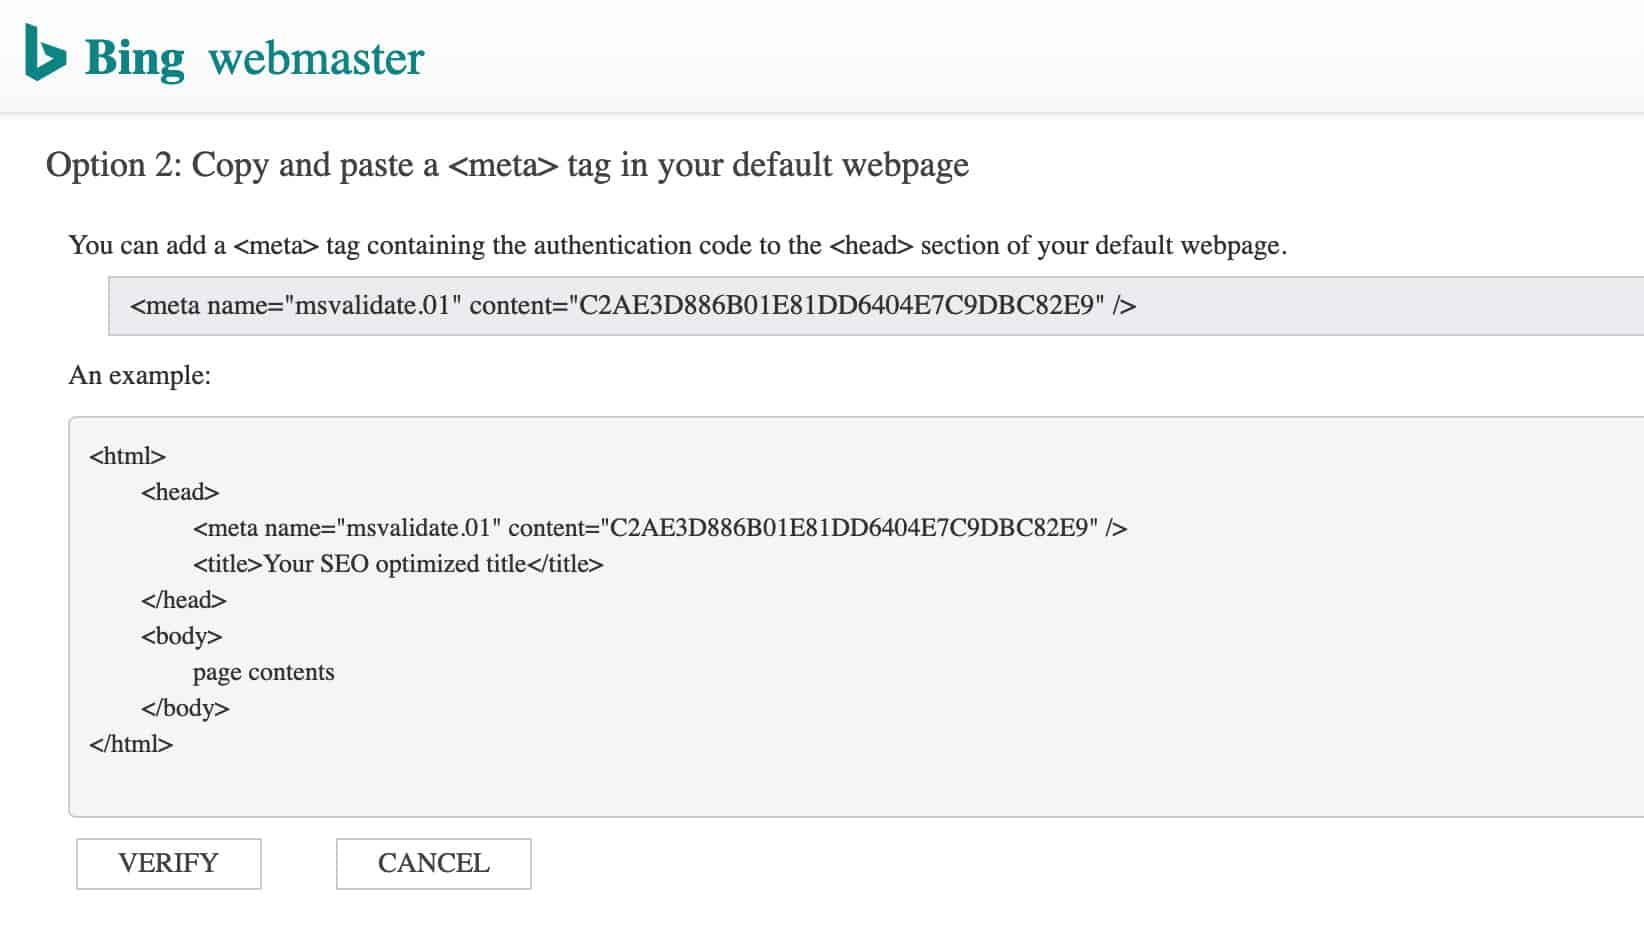
所有権を確認することでショップとBingの接続を完了することができるように、確認手順が表示されます。 3つのオプションがあります-あなたのウェブページにメタタグをコピーして貼り付ける必要があるものを選択してください。 ヘルプが必要な場合は、ShopifyとWooCommerceでそれを行う方法を説明します。
推奨リソース
- CarsonによるShopifySEO用のGoogleウェブマスター(検索コンソール)ツールの使用方法
- HubSpotによる2019年のGoogle検索コンソールの究極のガイド
おすすめのアプリ
- Google検索コンソール
- Bingウェブマスターツール
- Google XMLサイトマップ(WooCommerceプラグイン)
- Yoast SEO(WooCommerceプラグイン)
メールプロバイダーを設定する
eコマースストアの重要なコンポーネントは、その電子メールサービスプロバイダーです。 これは、すべてのトランザクションEメール(注文確認、出荷確認、フィードバックEメールなど)のベースであるだけでなく、強力なマーケティングツールでもあります。 これはeコマースビジネスを持つための必須の部分であり、それに立ち上げることを優先する必要があります。
なぜそれが重要なのか
電子メールの重要性は誇張することはできません。 これは、オンラインショッピングの期待されるコンポーネントとなっている注文の送信と出荷確認が含まれているため、ビジネスを成功させるための基本的なツールの1つです。 トランザクションメールは注文の成功について直接フィードバックを提供し、購入をいつ受け取ることができるかについての期待を設定するため、消費者との信頼を築きます。 これにより、オンラインショッピングに明確さと信頼がもたらされます。そうしないと、不明確で日陰になるリスクが発生する可能性があります。
同様に重要なのは、これまでで最も効果的なマーケティングチャネルの1つであるということです。 ある調査によると、オンライン購入者の76%がメールキャンペーンの結果として購入したことがわかりました。 あなたのマーケティング戦略で電子メールを十分に活用しないことはあなたのビジネスにとって損失になります。
始める方法
電子メールプロバイダーを設定するための最初のステップは、使用する電子メールプロバイダーを選択することです。 選択できるものはたくさんあり、どのプラットフォームが最も話しやすいかを自由に選択できます(以下の推奨アプリのリストを参照)が、この場合は、Klaviyoを使用して開始プロセスを説明します。
最初のステップは、電子メールプロバイダーでアカウントを作成してから、ストアをアカウントに接続することです。 Klaviyoは、使用しているeコマースプラットフォームを尋ねます。 Shopify、WooCommerce、Magento、BigCommerce、Volusion、OpenCartなどのストアに簡単に接続できます。 Shopifyでは、ストア名を挿入するだけで済みますが、WooCommerceではAPIキーを入力する必要があります。
ストアがKlaviyoに接続されると、メールテンプレートの基本的なデザインを設定するように求められます。 ロゴをアップロードし(できれば背景なしで、背景が透明なPNGファイルを使用する可能性があります)、ソーシャルメディアハンドルを設定し、メールに反映させる色を選択します。 視覚的なブランドの継続性を提供するために、これらはWebサイトに表示されているものと同じ色にする必要があります。 Klaviyoでは、色を16進カラーコード形式で表示する必要があります。 ウェブサイトの16進カラーコードがわからない場合は、このChrome拡張機能を使用してウェブサイトから色を選択してください。
設定が完了すると、すでに設定されているウェルカムメールフローシリーズを利用したり、独自のメールを作成したりできます。 最初にこれらのメールをまとめることをお勧めします。
- 注文確認メール
- 発送確認メール
それが完了したら、次の内容を含むEメールマーケティングシステムの構築に進むことができます。
- 製品レビュー/フィードバックリクエストメール
- クロスセリングメール
- メールを購読していただきありがとうございます
- 放棄されたカートのリマインダー
推奨リソース
- KlaviyoによるKlaviyoでトランザクションメールを設定する方法
おすすめのアプリ
- クラビヨ
- Mailchimp
- Conversio
例
- Mailchimpによる本当に良いメール
Gravatarをセットアップする
GravatarはGloballyRecognized Avatarの略で、ブログ、フォーラム、Slack、メールにコメントしたり、自分で記事を投稿したりするたびに、ウェブ上で名前の横に表示されるメールアドレスに関連付けられた画像です。 言い換えると、Gravatarは、電子メールアドレスに一意に関連付けられた小さなヘッドショットであり、インターネット全体で統一された認識可能なビジュアルIDを提供します。
今日、Gravatarのサービスは、WordPress、GitHub、Hootsuite、Disqus、ModXなど、何百万もの人々やWebサイトで世界的に認識され、使用されています。
このセクションでは、Gravatarをセットアップして使用する理由と方法を説明します。
なぜそれが重要なのか
Gravatarを設定していない場合、デフォルトの画像がコメントやオンライン投稿の近くにヘッドショットとして表示されますが、これはあまり個人的でも信頼できるものでもありませんか? もちろん、略歴と画像をすべてのブログプラットフォームに個別に追加できますが、Gravatarを使用すると、時間を節約し、多くのチャネルで普遍的なアイデンティティを確立できます。
Gravatarを使用すると、記事に投稿したりコメントしたり、Web全体で他のアクションを実行したりするときに、個人的なイメージやブランドを強化する無料の機会になります。 Gravatarアカウントを作成する主な理由は次のとおりです。
- 専門家のプロフィールを作成する:自分のビジネス分野の専門知識を示したい場合は、立派なブログ、フォーラム、その他の業界関連のWebサイトで関連するトピックに取り組む必要があります。 Gravatarプロファイルを使用すると、関連付けられた画像と、フルネーム、説明、およびWebサイトとブログへのリンクを含むプロファイルのおかげで、自分が誰であるかが即座に認識されます。
- eコマースストアまたはウェブサイトへのトラフィックを増やす: Gravatarプロファイルにリンクを追加すると、コメントを見た人は誰でもあなたのプロファイルを見ることができ、最終的にはウェブサイトまたはeコマースストアにアクセスできます。 これにより、トラフィックが増え、ブランドの影響力が高まる可能性があります。
- ソーシャルネットワークを宣伝する: Gravatarプロファイルにソーシャルメディアプロファイルへのリンクを追加して、ソーシャルネットワークの認知度を高めることができます。
- ブランドの権威を強化する:会社のロゴをGravatarの1つとして追加できます。これにより、ブランドの認知度と権威を高めることができます。
Gravatarを作成する方法
Gravatarのセットアップは無料で、5分もかかりません。 方法は次のとおりです。
ステップ1:サインアップ
GravatarのWebサイトにアクセスし、電子メールまたはWordPressアカウントでサインアップします(まだ持っていない場合は、WordPressから作成するように求められます)。 アカウントごとに無制限のメールアドレスとGravatarを追加できます。
ステップ2:画像を選択する
[マイグラバター]タブで1つまたは複数の画像を追加します。 あなたはプロの顔写真、あなたの非公式なイメージ、あるいはあなたのブランドのロゴさえも選ぶことができます。 選択する写真は、自分自身とブランドを中心に構築したい画像の種類によって異なります。
[マイグラバター]タブで複数のメールアドレスを追加することもできます。 たとえば、個人用とプロ用のメール用に異なるGravatarを作成できます。 または、情報メールと会社のロゴを個別のGravatarとして追加することもできます。
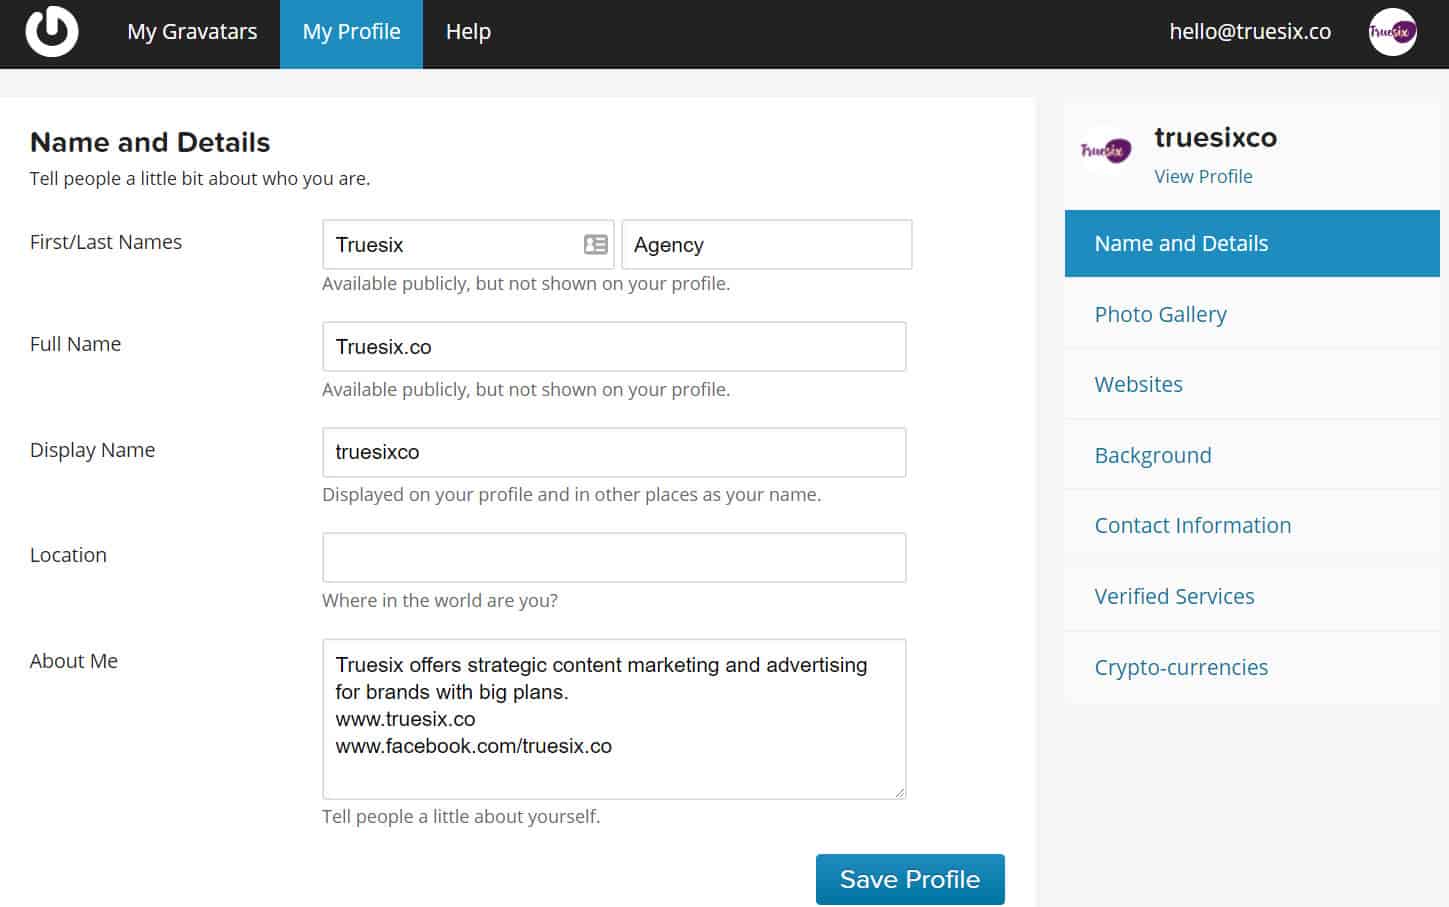
ステップ3:情報をカスタマイズする
[マイプロフィール]タブに名前、説明、その他の詳細を追加します。 会社の公式Gravatarの場合は、説明にWebサイトまたはeコマースストアへのリンクを追加します。
広告
推奨リソース
- Gravatarとは何ですか? それを作成して使用する方法は? 最初のサイトガイドによる
- ブログやウェブサイトにGravatarを使用する方法に関するガイド– 2018 by Make a Website Hub
- より良いブランド:より良いレモネードスタンドによるeコマースブランディングガイド
- WordpressによるWordPressでGravatarを使用する方法
おすすめのアプリ
- Gravatar
ポップアップと終了インテントを設定する
電子メールキャプチャポップアップと終了意図ポップアップ(「ライトボックス」と呼ばれることもあります)は、Webサイトの最前線にポップアップし、Webサイトの所有者が強調したいものすべてに注意を向けるボックスです。 ポップアップは、サイトにアクセスした直後、またはWebサイトで一定の時間を費やした後(たとえば、10秒後、またはページの50%を下にスクロールした後など)に表示されますが、終了を意図したポップアップは、訪問者は、カーソルを「戻る」または「x」ボタンに向けて動かし始め、ページを離れます。
ポップアップの内容は、訪問者に電子メールリストへのサインアップ、電子書籍などのデジタル景品の収集、購入の割引の提供などさまざまです。
なぜそれが重要なのか
ウェブサイトのポップアップは、ストアの所有者であるあなたが強調したい1つのことに直接訪問者の注意を引き付けます。 それを(訪問者に何かを提供することによって)訪問者に価値を提供することと組み合わせると、成功のための保証されたレシピが得られます。
ポップアップで達成できる目標はさまざまです。
- 訪問者が店舗に到着したら割引コードを提示して、購入を促します。 割引を受けていることをすでに知っている場合は、購入する可能性が高くなります。
- 彼らの電子メールを収集することにより、あなたの販売ファネルにそれらをキャプチャします。 彼らの電子メールを使用して、キャンペーンの電子メールやその他のプロモーションを送信して、購入のためにウォームアップすることができます。
- 彼らが去ろうとしているときに彼らを捕まえることによってあなたの影響範囲に訪問者を保ちます。 彼らにあなたの電子メールリストに参加するように頼むか、彼らに最後の割引を与えるか、彼らに滞在させるためにあなたの送料無料の取引を彼らに思い出させてください。
基本的に、ポップアップは訪問者をつかまえることができるものです。 初めての訪問者の2%だけが購入する可能性が高いので、興味を持っていたが何らかの理由で購入しなかった98%を捨てるのは残念です。
これらの潜在的な購入者をより多く保持するには、それらをメーリングリストに登録するか、ポップアップを使用して購入を支援し、その結果、コンバージョン率を劇的に向上させます。 これにより、ポップアップを最大限に活用できるため、トラフィックを増やすために使用される作業が無駄になることはありません。
始める方法
ステップ1:あなたの目標を特定する
始めるために、最初にあなたの目標を考えてください。 ポップアップの目的に基づいて、ポップアップ自体にさまざまなコンテンツが表示されます。 ポップアップに含める必要のあるコンテンツの種類とともに、ポップアップの目標の例を次に示します。
- 目標は、去る訪問者を捕まえることです:あなたのニュースレターを購読するという申し出で出口意図のポップアップを作成してください
- 目標は販売を行うことです:訪問者があなたの店に入るときに割引を提供します
- 目標は、電子メールニュースレターを増やすことです。電子書籍やガイドなどの無料でダウンロード可能なコンテンツを含むポップアップを表示し、訪問者にコンテンツを取得するための電子メールアドレスを提供するように依頼します。
ステップ2:ポップアッププロバイダーを選択する
目標がわかったら、ポップアッププロバイダーを選択します。 選択できるものはたくさんありますが、eコマースストアを含むすべてのオンラインWebサイトに実装できるSumoポップアップをお勧めします。
ステップ3:ポップアップを作成する
次に、ポップアップをまとめる必要があります。 これには、デザイン、カラーテーマ、コピー、および召喚状(CTA)ボタンの選択が含まれます。
効果的なCTAを実現するには、ボタンのコピーを魅力的なテキストに変えて、訪問者にオファーの選択を促します。 たとえば、ボタンのデフォルトの「いいえ」オプションを使用する代わりに、次のように「いいえ、15%オフにしたくない」に切り替えることを検討してください。
ステップ4:稼働する
最後に、サイトでポップアップを起動します。 早すぎることはなく、遅すぎることもありません。
推奨リソース
- eコマース用のメールポップアップ:より良いレモネードスタンドでメールを収集して売り上げを伸ばす方法
- より良いレモネードスタンドによる相撲レビュー
- 相撲による20億の分析されたポップアップからのポップアップ統計
おすすめのアプリ
- 相撲
- Privy
- MaxTraffic
例
- Printfulによってあなたの店のために盗むポップアップの40の例
- MaxTrafficによる13のシンプルで驚くほど効果的なExit-Intentポップアップの例
トランザクションメールを設定する
トランザクションEメールは、顧客がWebサイト内で特定のアクションを実行した後に送信される自動化されたEメールメッセージです。 これらの電子メールは本質的に宣伝用ではなく、登録や購入の確認、出荷通知、パスワードのリセット手順、ステータスの更新などの重要な情報が含まれていることがよくあります。
オーディエンスとのエンゲージメントを維持するには、Webサイトで可能なすべてのインタラクションに対してトランザクションメールを配置することが不可欠です。 たとえば、顧客がポップアップまたはサインアップフォームを使用してニュースレターにサインアップする場合は、自動化された「購読していただきありがとうございます」の電子メールが続くことを確認してください。 彼らが購入をする場合、彼らが彼らの購入があなたの側で認識されたと彼らが感じることを確実にするために彼らが注文確認メールを受け取ることを確認してください。
正しく行われた場合、トランザクションメールは、ブランドを強化し、その声、デザイン、および個性を表現するための強力な方法になる可能性があります。
なぜそれが重要なのか
買い物客は購入が確認されたことや注文がいつ到着するかを知りたいので、トランザクションメールの開封率は大幅に高くなります(非トランザクションメールの21.6%に対して約47%)。
トランザクションメールは、ニュースレターやその他のマーケティング活動から分離する必要がある技術的または管理上のコミュニケーションと見なされることがよくありますが、トランザクションメールは顧客の注意を引く可能性が高いため、ますます多くのマーケターがこのコミュニケーションチャネルをブランドを構築する機会と見なしています。 。
トランザクションメールがスマートでユーザーフレンドリーな方法で実行される場合、それらはリピート販売を生み出し、顧客エンゲージメントを高めることができます。 Experianによるトランザクションメールレポートによると、トランザクションメールあたりの平均収益は、標準のバルクメールの2〜5倍です。
トランザクションメールをカスタマイズするためのいくつかのアイデア:
- メールにブランドのデザインと声のトーンを反映させる
- 購入したばかりの製品のハウツービデオやユーザーガイドを含める
- ソーシャルメディアプロファイル(または関連する場合はモバイルアプリ)へのリンクを追加します
- 次の購入のための排他的な取引を提供する
- 季節性と購入履歴に基づいたクロスセリングを組み込む
トランザクションメールを設定する方法
ShopifyやWooCommerceなどの最大のeコマースプラットフォームは、ビジネスニーズに応じて編集できる組み込みのトランザクションメールシステムを提供します。 たとえば、Shopifyのトランザクションメールテンプレートを使用して、新しい注文が行われた後、カートが破棄された後、注文が送信された後など、オーディエンスにリーチできます。

eコマースプラットフォームが提供するテンプレートを使用せずにトランザクションメールを設定するには、専用のメールプラットフォームを選択する必要があり、開発者の支援、または少なくともHTMLとAPIの知識が必要になる可能性があります。 時間の経過とともに、電子メールのコンテンツ(テキスト、召喚状、ビジュアルなど)をコーディングする方法を学ぶことができますが、電子メールを送信するためのトリガーと条件を設定するのは開発者です。
最も価値のあるトランザクションメール:
- 注文確認メール:訪問者が購入すると、それを確認する自動メールが届きます。 これにより、注文が正常に受け取られたという安心感が得られます。 これらのメールを使用して、顧客が好む可能性のある他の製品を提案したり、次の注文で使用するプロモーションコードを提供したりすることもできます。
- 発送確認メール:商品が発送されると、購入者はそのことを知らせるメールを受け取ります。 これにより、出荷時間に関する期待が設定され、顧客は注文を期待し始めることができることを知ることができます。
- 放棄されたカートの電子メール:訪問者に、ショッピングカートに商品を残したことを思い出させます。 割引コードを提供して、購入を完了するための追加のナッジを提供します。
独自のトランザクションメールフローの作成に着手した場合は、そのようなメールを送信する必要がある場合に関連するすべてのケースについて考えてください。 次に、トリガーを決定し、電子メールのコンテンツを準備します。
推奨リソース
- より良いレモネードスタンドによる電子メールでより多くの売上を促進するためのビギナーズガイド
- ExperianによるトランザクションEメールレポート
- Hubspotによる動的コンテンツを使用してトランザクションEメールをパーソナライズする方法
- CrazyEggによる完璧なトランザクションメールを作成する方法
おすすめのアプリ
- Conversio
例
- トランザクションメールの例#1
- トランザクションメールの例#2
- トランザクションメールの例#3
競合他社を監視する
競合他社の行動、長所、および短所を認識することは、あらゆるビジネスの主要な要素の1つです。 以前は、地元の人からの口コミを聞くか、ライバルの店ではなく、何人の顧客があなたの店に入るのかを数える必要がありました。 幸いなことに、今日、あなたの競争を監視することははるかに簡単です。 たとえば、新製品や新サービスの発売、参加するイベント、Web全体での露出を追跡します。
このセクションでは、競合他社の中で自分がどこに立っているかを正確に把握するのに役立つツールとWebサイトを紹介します。
なぜそれが重要なのか
まず、競合他社のオファーについて知らされることで、競合他社の長所と短所を確認し、独自の競争上の優位性を構築できます。 あなたはあなたの競争にマッチするか打ち負かすためにあなた自身の申し出を調整するか、群衆から目立つための戦略を考え出すことができます。
第二に、それはあなた自身のコンテンツと戦略を刺激することができます。 ブランドがうまく機能しているのを見たら、彼らが何をしているかを分析し、したがって、彼らの成功をリバースエンジニアリングすることができます。 彼らがどのように効果的にコミュニケーションを取り、どのように新製品をめぐって誇大広告と収益を上げ、どのようにコミュニティに参加しているかがわかります。 これらはすべて、あなたがあなた自身の戦略を知らせることができる経路として機能することができるものです。
最後に、あなたはあなたのニッチで大きなプレーヤーを見ることによって時間とお金を節約することができます。 どうして? 彼らはおそらく市場調査に多額の投資をして、何がうまくいくかを見つけたからです。難しい方法です。 そうすれば、自分で研究開発に投資することなく、トレンドに便乗することができます。
始める方法
あなたの競争相手を監視するために、あなたは彼らの軌道に入る必要があります。 競合他社を最大限に活用するためのいくつかの戦術を次に示します。
ステップ1:主要な競合他社のリストを作成する
広告
理想的には、競合他社のすべてのオンラインアクティビティ(Googleの存在感、価格設定、最高の機能など)を示すスプレッドシートに記入します。
ステップ2:競合他社をグーグルで検索
グーグル(どのページが現れるか)で彼らの存在をチェックして、彼らのウェブサイトを訪問してください。 また、いくつかのバリエーションであなたの製品、サービス、またはニッチの名前をグーグルで検索し、どの会社が最初に登場するかを確認してください。 理由を分析してみてください:彼らは有料広告を使用していますか、より良いオファー、より高いウェブサイトドメインなどを持っていますか?
ステップ3:ソーシャルネットワークをフォローして監視する
競合他社の投稿の内容と頻度に注意してください。 ハッシュタグで会社名とトピックを検索し、どのキーワードを自分で使用するのが賢明かを見つけます。
ステップ4:メーリングリストにサインアップする
競合他社がリリースする新製品や新機能、競合他社が提供する特別な取引、競合他社が送信するキャンペーンの頻度、および競合他社が使用するCTAに注意してください。 また、Really Good Emailsデータベースを参照して、業界内の他の企業からの高品質の電子メールの例を探すこともできます。
ステップ5:カスタマーレビューを綿密に監視する
業界によっては、顧客がFacebook、Trustpilot、Reddit、および人々が自分の経験について話すその他のサイトにレビューを残す可能性があります。 競合他社があなたのビジネスと比較したレビューの数、人々の満足度、主な苦情などに注意してください。
ステップ6:競合他社が言及されたときに通知するツールを使用する
ツールを使用して、オンラインでの言及やサイトで何かが変更されたときに監視します(以下の「推奨アプリ」セクションでこれらのツールを見つけてください)。
推奨リソース
- NeilPatelによる競合他社をスパイするのに役立つ25の卑劣なオンラインツールとガジェット
- SEMrushによってオンラインであなたのビジネスの本当の競争を決定する5つの方法
- BigCommerceで競合他社を調査する方法
- Ahrefsによる競合他社の分析ツール
- 競合他社のコピーをやめる:競合他社もCXLで何をしているのかわからない
おすすめのアプリ
- 言及:あなたまたはあなたの競争相手がオンラインで言及されるたびにあなたに通知します。 また、Slackと統合して、通知を専用のSlack-Mentionチャネルに取り込み、毎日の要約を提供します
- 視覚化:競合他社のWebページの一部(価格設定ページなど)を選択し、変更されるたびに通知を受け取ることができます
- SpyFu:競合他社が購入しているキーワードとアドワーズ広告を表示します
- Googleアラート:自分や競合他社の言及を取得するのに便利です
- SocialMention:ソーシャルメディアとブログの言及を追跡するためのツール
- Adbeat:競合他社の広告戦略を監視するのに役立ちます
- SEMrush:SEMrushを使用して、競合他社がランク付けしている最も収益性の高いキーワードを追跡します
オペレーション
あなたのビジネス領収書を追跡する
領収書の整理を開始するまでは、自分のビジネスを運営することはすべて楽しくてゲームです。 それを逃れることはできません。 ある時点で、一番上の引き出し、ブリーフケースの一番下、ジャケットのポケットにある紙の雑然としたものに対処し始める必要があります。
ありがたいことに、すべてをノートに書き留めたり、すべての領収書を空の靴箱に詰めて忘れたりすることで、昔ながらの方法でそれを行う必要はありません。 私たちはよりペーパーレスの世界に向かって進んでおり、私たちの側にもテクノロジーがあります。 There are plenty of receipt tracking tools available to help you save precious time, as well as provide access to your receipts from multiple locations which is something your accountant will come to appreciate.
Why It's Important
First of all, good recordkeeping (and that includes keeping track of your receipts) will help you monitor the progress of your business, prepare financial statements, and your tax returns. Keeping receipts will also help you with tax deductions and might save your business money in the long run.
Additionally, by using receipt scanners and tracking apps, you'll be able to automatically extract the key information—like the date, merchant, amount spent, and payment method—to keep tabs on your finances on the go.
While it might take some time to get used to new technologies, keeping your receipts online will dramatically reduce the time and effort you put into tracking and organizing expenses. It will also make it easier to hand that information over to your accountant and avoid hassles come tax preparation time.
How to Get Started
Right from the start, you should establish a system to organize your receipts. Will you:
- Stick to tried-and-tested systems and file receipts in binders and folders?
- Or will you embrace technology and use online services and apps, such as Shoeboxed and others listed below?
That's up to you to decide. One thing you can do regardless of your choice is create a separate email account that's dedicated to receipts and expense keeping only. This means that whenever you get a receipt, you scan and forward it to this email address and collect all receipts there. We recommend also creating an “[email protected]” email address that you can use to forward all digital business receipts to so they stay organized in their own inbox. Sign up to all your business-related tools with this accounting email and then set a rule in your mailbox so that everything sent to that email address gets automatically forwarded to your “Business Receipts” inbox.
That way, it will be much easier to keep track of your expenses and search for a specific receipt instead of going through several possible storage places like your email accounts, phone, computer, and other devices.
You can also connect that email to a receipt tracking app, like Neat or Shoeboxed so that all receipts are forwarded and logged automatically.
So, which types of receipts should you pay extra attention to and definitely keep?
- Meals & Entertainment: Document all your business meetings and record the purpose and attendees of every meal and outing on the back of the receipt
- Business Travel: Keep any travel-related receipts when traveling for business purposes
- Vehicle-Related Expenses: Record where, when, and why you used the vehicle for business
- Receipts for Gifts: Keep receipts for any business-related gifts you purchase
- Home Office Receipts: Keep receipts for costs related to running your home office
Recommended Resources
- Which Receipts Do You Need to Keep as a Small Business Owner by SquareUp
- How to Keep Your Business Receipts Organized by The Balance SMB
Recommended Apps
- 靴箱入り
- Neat
- Receipts by Wave
Online Security Best Practices
It's surprising how often protecting our own businesses can be the last task on our to-do lists. No matter what stage your business is at—whether you've just launched or are successfully growing—make sure that you take the basic steps to secure it. After all, if you won't protect your business, then who will?
Why it's Important
When we talk about your store's security it includes many things, from online attacks to losing files in a computer crash. Keeper Security conducted a survey and found the most common security problems small businesses face and here they are:
- Phishing (48%): An attempt to trick users into sharing sensitive information online such as passwords, usernames, and credit card details
- Web-Based Attacks (43%): Programs that are written to probe a user's computer and exploit security holes
- Malware (36%): A virus or any other type of software intended to damage a computer or computer system
- Lost or Stolen Devices and/or Files (30%): Misplacing important devices or documents
- Denial of Services (26%): Flooding a website with fake (bot) traffic to slow it down or take it offline
Now, when it comes to online attacks, you may think that as a small business owner you're not appealing to hackers. Unfortunately, you're wrong. According to the data by SCORE, 43% of all cyberattacks are directed at small businesses and this number is expected to increase. Those who fall victim to cyberattacks have also been found to never fully recover, with 60% discovered to be out of business within six months.
If you don't want to risk yours and your customers' sensitive data, find some time in your schedule to secure your business.
How to Get Started
Here are the basics of protecting your business online:
- Use Unique Passwords on All Accounts: Make sure your passwords are strong, which means nothing common (like ”12345”) or guessable (like your name). Use a password manager like Dashlane for storing all your passwords and to generate strong passwords.
- Set up 2-Factor Authentication: This means that there will be two levels of authentication in order for you to log into the account. For example, if you set up 2-factor authentication for your Gmail account, you'll first need to type in your password followed by a unique code that you'll be able to access either through email, text message or from an authentication app like Authy. Most popular services support 2-factor authentication. Find all the places you can set up 2FA for with the Two Factor Auth List.
- Secure Your Email: First, turn on 2-factor authentication—it will protect your email from getting hacked. Second, watch out for phishing emails and malware and don't respond to them.
- Use a VPN on Shared WiFi: A Virtual Private Network (VPN) is a tool you can use to encrypt your internet connection which helps to protect your login credentials and other sensitive information from hackers sharing the same public WiFi as you. Using a VPN is imperative if you work in coffee shops, airports or any kind of public space but it's generally just a good tool to use at all times. Check out NordVPN to set up your own VPN.
- Encrypt Your Devices: So that in case they get stolen or lost, no one can access your files. 方法は次のとおりです。
- Mac: Enable FileVault in your Settings panel
- PC: Use BitLocker if your computer is compatible. Otherwise, use one of these alternatives
- iPhone: Encryption is enabled automatically with your passcode
- Android: Select the “Encrypt phone” option under Security in your settings menu
- Back-Up Everything: Your website, your computer files—everything. You don't want your business to stop (or die) just because you've lost important files like product sketches, print files, copyright certificates, or because an accident happens and your website crashes. Use Rewind (Rewind Review) to backup your Shopify or BigCommerce store and use VaultPress to backup your WordPress site or WooCommerce store.
- Recognize Fraudulent Orders: Over the next 5 years, retailers are estimated to lose over $130 billion on fraudulent orders. Pay attention to red flags like larger-than-average orders, unusual locations, multiple transactions over a short period of time, etc. Your payment processor may also be able to help you spot fraudulent purchases which can help you steer clear of them.
- Diversify Your Marketing & Revenue Stream: Sell your products on several platforms and use different marketing channels to promote your business so you'll protect your business and revenue stream in the even that sudden third-party policy changes result in denial of services. This is a relatively common thing that can happen to sellers on marketplaces like Amazon or Etsy and if you've put all your eggs into one basket it can be catastrophic for your business if you're ever banned from a selling channel.
Recommended Resources
- How to Bulletproof Your Online Business by A Better Lemonade Stand
- The Basics of Ecommerce Fraud—What It Is and How To Manage It by Printful
- Two Factor Auth List
Recommended Apps
- Dashlane
- NordVPN
- スクリ
- 巻き戻し
- VaultPress
- Authy
Set Up Your Policies
Website policies are a set of rules, procedures, and guidelines that define the operating principles of an online store. Simply put, website policies explain what customers can expect from the website, how it operates, what type of data it gathers and why, the rights and obligations of a website user, the shop's shipping and returns policies, etc.
Here are the 3 website policies that every ecommerce store must have:
- Privacy Policy: This describes what data (email, physical address, cookies and browsing history, etc.) you collect from your website visitors and purchasers and for what purposes. In certain countries and states, a privacy policy is required by law.
- Terms of Service: This defines what customers can expect from your business as well as their rights and obligations. Basically, it's an agreement between the store and its users.
- Returns Policy: This states how a store handles returns and/or exchanges. A user-friendly returns policy can make your shop look more trustworthy and help encourage consumers to shop with you.
Why it's Important
California, the European Union, Canada, Australia, as well as other jurisdictions legally require online sellers to state their privacy policies. It doesn't matter where your business is based, if you sell to these states and countries then you must have policies that describe how your store collects and uses customer data.
While some jurisdictions are quite lenient with privacy policies, others impose strict laws to protect customer data. For example, the EU's GDPR (General Data Protection Regulation) imposes fines for non-compliance which can be up to $22.8 million or 4% of the annual revenue, whichever is higher.
Besides complying with laws, there are other reasons why your store needs policies:
- It Increases Trust: Clear store policies make your business look transparent and trustworthy. In fact, a survey found that 63% of online consumers look at a store's return policy and only then make their buying decision.
- It Boosts Conversions: Naturally, when people find a business trustworthy, they are more willing to make a purchase.
- It's Required by Third-Party Solutions: Services like Google AdWords, Google Analytics, Facebook, and many other services that process customer data and then allow you use the data for your marketing (think: retargeting, traffic analytics, etc.), require online stores to have a Privacy Policy.
How to Get Started
Step 1: Find a Template
The good news is you don't have to write your store policies from scratch or hire a lawyer to do it. The internet is full of templates that you can customize and use for your shop. Here's what a good template looks like:
- It's Easy to Read & Understand: Avoid templates that use jargon or complex sentences, or you risk leaving your customers confused and suspicious. Besides, if you sell to Europe, remember that according to GDPR your privacy policy must be clear and easy to read, or you can be fined.
- It's Brief: Don't make your policies longer than needed, or your customers won't read them. Make sure your policies provide visitors with all the information needed in a clear and concise way.
- It Includes All the Important Terms: Each of your website policies—terms of service, privacy policy, and refunds policy—should include different terms. Below what each of the policies should include.
Terms of Service:
- Payment Details: What payment forms you accept, what currency customers will be charged, etc.
- Delivery Information: What shipping methods you offer, average delivery times, etc.
- Returns & Refunds: Whether or not you accept returns, whether you offer product exchanges, how you process refunds, etc.
- Warranty: Do you offer a warranty and for how long?
- Trademarks: When people can or can not use your products and what references they must give
Privacy Policy:
広告
- What information your company collects and for what purposes
- The storage, maintenance, and security of collected data
- If your company shares the data with third parties
- The process of updating user information (for example, how to unsubscribe and delete one's data)
- Your cookie policy, including what types of cookies your company uses and for what purposes
- Potential for change in the privacy policy which is basically a disclaimer that your privacy policy can change and get updated
Returns Policy:
- Your return window
- What condition the product must be returned in (unused, unworn, tags still intact, etc.)
- How to initiate a refund
- Where to return the goods
- Who pays for the return shipping
- How the refund will be provided (whether in the same payment form it was collected in, store credits, a gift card to the store, a replacement product, etc.) and in what time frame the refund will be processed
Step 2: Add Policies to Your Website
There are two ways you can display your policies on your website:
Browsewrap: As a link in the footer of your website
Clickwrap: As a box that users must check at the checkout when making a purchase, or when subscribing to your newsletter
The best way is to implement both browsewrap and clickwrap methods, that way your visitors are more likely to feel safe and informed.
Recommended Resources
- GetTerms.io
- Terms and Conditions Generator by Shopify
- Privacy Policy Generator by Shopify
- Free Return Policy Generator by Shopify
- Sample Privacy Policy Template by TermsFeed
Outsourcing Tasks
When building a business, it can be tempting to try to do everything by yourself, however, you only have 24 hours in a day to create your products, write the copy for your webpages, plan the logistics, do the accounting, oversee marketing and PR, handle customer support, and so much more. There will never be enough time to get it all done yourself so this is why it's important to find other professionals to do some of the work in your stead. That's called outsourcing.
Outsourcing is the practice of using an outside party—such as another company or a freelancer rather than your business's employees—to perform certain services or job functions. The purpose of it is to delegate tasks to someone else in order to free up your own time.
Here are some of the tasks you can consider outsourcing:
- コンテンツマーケティング
- ロゴデザイン
- Bookkeeping
- リサーチ
- Conversion optimization
- グラフィックデザイン
- 翻訳
- Social media
- Photo/video production
Why It's Important
Research shows that when trying to manage multiple projects at once, you can experience a 40% drop in productivity, your projects take longer to complete, and overall stress levels increase. Especially for small businesses or startups, any reduction in everyday tasks will let you shift the focus to more revenue-generating activities.
Another great reason to outsource is that it allows you to access skilled talent nearby or worldwide. There are so many tasks that are best left to the pros rather than trying to fumble through them yourself, so those things are best outsourced to the people who can execute them properly and efficiently. Think of it this way—if it's going to take you a lot of time to figure out how to do a mediocre job at something, you're better off outsourcing the task to someone who can complete it better and faster than you can.
Besides, having a fresh perspective from someone outside of your team can lead to innovative, creative approaches and cutting-edge solutions that would otherwise remain hidden to you.
Last but not least, outsourcing can also save you money. When you outsource to a freelancer or contractor you won't incur the same costs as you would hiring an employee, plus by hiring someone to complete a task you don't know how to do, it saves you the time it would take to learn how to do it yourself and time is money in the long run. Outsource the work you can't do to people who can so you don't have to spend more later to fix the mistakes you made trying to do everything yourself.
How to Get Started
Step 1: Identify Outsourceable Tasks
Begin by figuring out what type of work you want to be done: Is it social media? Bookkeeping? Content creation? Try to think of the aspects of your business where you need help or expertise, but don't have enough hours in the day to do yourself.
Then, define the scope of the work whether it's a short-term task you want to outsource or if you're looking to collaborate for recurring projects.
Step 2: Find a Contractor
Next, find the right contractor. If you know a professional you've worked with previously (or have recommendations from friends or colleagues), start looking there.
Otherwise, there are virtual freelancer marketplaces like Upwork or FreeeUp, where you can connect with professionals from all over the world. Check their portfolio to see whether their skill set and rates match your needs and if there are testimonials from previous clients to provide reliability. Then get in touch with the freelancers or contractors you're interested in with any additional questions about their knowledge and expertise, when they're next available, and their compensation requirements.
Step 3: Provide a Brief & Define the Working Relationship
Once you establish a working relationship with your contractor, provide detailed instructions about the task, as well as prepare a contract which may include information like:
- What work the freelancer will deliver and when
- If the project is fixed-price or hourly
- Price rates
- When and how payments will be made
Communication is the key to a great outsourcing experience, so be sure to communicate throughout the project to make sure the work is being done and your expectations are met.
Recommended Resources
- 10 Tips to Source and Hire The Best Freelancers Online by Upwork
- How to Grow Your Business by Hiring Freelancers by Guru
Recommended Apps
- アップワーク
- FreeeUp
- Fiverr
Examples
- 5 Outsourcing Success Stories (and 2 Failures) That Any Startup Could Learn From by Daxx
- 14 Multi-Million Companies Who Were Built Leveraging Outsourced And Remote Developers by Codeable
Generate Traffic
Set Up Social Media Automation
Social media automation is the process of creating and scheduling social media posts in advance. Instead of setting aside time multiple times per day for creating and posting live updates, you could publish them at predetermined times, or even use a tool that automatically filters or recycles relevant content onto your social channels on your behalf. Automating this process helps save time and lets you focus on other tasks at hand.
You can automate your social media channels by using social media automation tools that both automatically suggest content you can share, as well as schedule posts in advance. Some tools are able to use your existing posts and reuse them in varying formats, and others can even post your updates at times the app has calculated that your audience is at their most active.
Why it's Important
Setting up an automated system for scheduling your social media posts will help you:
- Maintain Consistent Content: Data shows that consistency is one of the most important factors why people continue to follow a brand, thus helping you to build a larger follower and customer base. Setting up an automated system and scheduling posts ahead can ensure that your social accounts are active even if you are offline.
- Control Your Social Media Strategy: When all posts are scheduled through the same platform, it will be easier to oversee the kind of content that is shared, as well as the time when you post it.
- Save Time: Instead of spending hours to manually log in and out of each social media platform, you can use a centralized dashboard on the automation tool to create and schedule content in advance.
How to Get Started
Step 1: Select an Automation Tool
Start by picking a social media automation tool from the list below. On the tool's platform, log in to the social media accounts you want to automate posts for.
Step 2: Schedule Posts
To schedule updates, enter the text, add media (pictures or videos), and any links you want to share. If you have more than one account connected, you can select which accounts the post should be shared with.
You can either publish the posts immediately, add them to the queue and let the automation tool pick the best time for publishing, or you can schedule the posts yourself, choosing a specific date and time. Fill up your social media content calendar by scheduling as many posts for the future as you like. You can use the tools' content libraries to pull in relevant posts to beef up your content, as well.
Most of the social media automation tools let you access their analytics page where you can see what kind of engagement there is on your posts. Keep an eye on what kind of posts perform well and share more content that resonates with your audience.
Recommended Resources
- Social Media Automation Rules No Brand Should Break by SproutSocial
- Why You Should Get Serious About Social Media Automation by Jeff Bullas
- Social Media Automation: Good, Bad, or Somewhere in Between by Articulate Marketing
- Content Gems for discovering new content to share
Recommended Apps
- MissingLettr
- Meet Edgar
- SmarterQueue
- バッファ
- Hootsuite
Examples
- 15 New Social Media Templates to Save You Even More Time With Your Marketing by Buffer
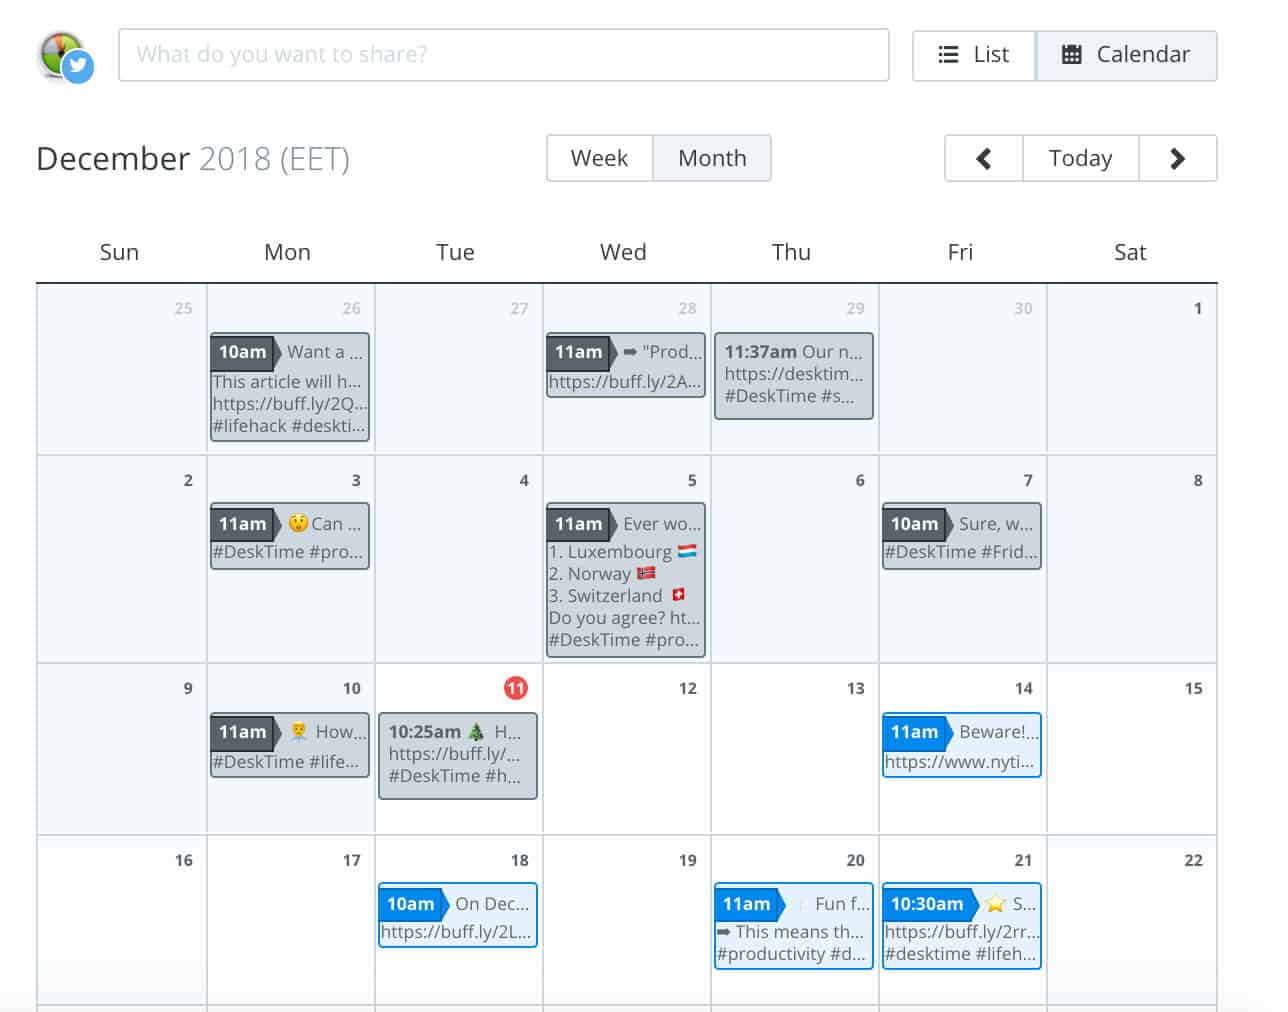
- See the social media calendar below including published and upcoming posts on Buffer
結論
Once you get through this list, your new online store will be better set up to approach future tasks. You'll be prepared to acquire website traffic, convert customers, delegate work to freelancers and contractors and get started marketing your new store. For more ideas on how to market your store to new customers so you can get more traffic and sales, check out the rest of our 52 Week Marketing Plan. We cover in-depth how you can actually get people to your store and what you can do to keep them there so they make a purchase.
