
如何将内容从 XML 文件迁移到 Drupal 8(或 9)
已发表: 2021-10-05将不同来源的数据提取到您的 Drupal CMS 就是迁移的全部内容。 您的迁移源可以是任何东西——数据库、另一个 CMS、CSV、XML 文件。 Drupal 始终为您提供将数据从任何地方迁移到 CMS 的灵活性。 在从数据库源迁移、从 CSV、从 SQL 源迁移多语言内容、完整的迁移指南等等之前,我们已经写了大量关于 Drupal 迁移的文章! 如果您正在寻找将数据从 XML 文件迁移到 Drupal 8 或 Drupal 9 的指南,那么您来对地方了,因为这就是我们将在这里讨论的内容!
如果您希望使用 Drupal 订阅模块将外部订阅源导入您的 Drupal 9 网站,请查看这篇文章。
Drupal 8/9 迁移模块
在这里,我们将使用整个 Drupal 迁移模块
- 迁移
- 迁移 Drupal
- 迁移加
- 迁移工具
安装这些模块后,您将需要创建一个自定义模块,您将在其中编写迁移脚本。 因此,首先,创建一个自定义模块,然后创建一个包含模块详细信息的 info.yml。 接下来,启用模块。
name: test migration type: module description: Migrating data from the csv files. core_version_requirement: ^8 || ^9 package: Migration dependencies: - drupal:migrate_source_csv - drupal:migrate_plus - drupal:migrate_tools config_devel: install: - migrate_plus.migration_group.test_migration - migrate_plus.migration.test_migration_sessions - migrate_plus.migration.test_migration_paper - migrate_plus.migration.test_migration_user创建 info.yml 文件后,您需要为此迁移创建一个迁移组。 您需要在以下路径中创建此迁移组: test_migration> config > install 。 运行迁移时需要这些详细信息:
id: test_migration label: test Migration description: Migrating xml data创建迁移组后,将此组安装在您的 info.yml 文件中。
config_devel: install: - migrate_plus.migration_group.test_migration现在,您需要为内容类型编写迁移脚本。 这个脚本应该在 config > install 里面,文件名应该是 migrate_plus.migration.test_migration_paper.yml
id: test_migration_paper label: 'Migrate Paper data from the xml file' migration_group: test_migration source: plugin: url # Full path to the file. data_fetcher_plugin: file data_parser_plugin: xml urls: private://xml/session.xml item_selector: /program/session/papers/paper fields: - name : title lable : 'Paper title' selector : papertitle - name : abstract lable : 'Paper abstract' selector : abstract - name : first_name label : 'Author first name' selector : authors/author/name/givenname - name : last_name label : 'Author last name' selector : authors/author/name/surname - name : paper_id label : 'Paper identifier' selector : paperid - name : session_id label : 'Session identifier' selector : sessionid - name : start_time label : 'Paper presentation start time' selector : starttime - name : end_time label : 'Paper presentation end time' selector : endtime - name : author_name label : 'Author name' selector : authors/author/name/fullname - name : session lable : 'Session name' selector : session ids: session_id : type : string process : # Adding the mapping between the fields and the csv columns. title : - plugin : skip_on_empty method : process source : title field_abstract/value : abstract field_abstract/format : plugin : default_value default_value : "full_html" field_presentation_timing/value : plugin : format_date from_format : 'Ymd\TH:i:s' to_format : 'Ymd\TH:i:s' source : start_time field_presentation_timing/end_value : plugin : format_date from_format : 'Ymd\TH:i:s' to_format : 'Ymd\TH:i:s' source : end_time field_paper_identifier : paper_id field_session_identifier : session_id field_author : - plugin : skip_on_empty method : process source : author_name - plugin : paper_user_migration_import_process no_stub : true field_session : - plugin : skip_on_empty method : process source : session - plugin : node_migration_import_process no_stub : true destination : plugin : 'entity:node' default_bundle : paper migration_dependencies : required : { } dependencies : { } 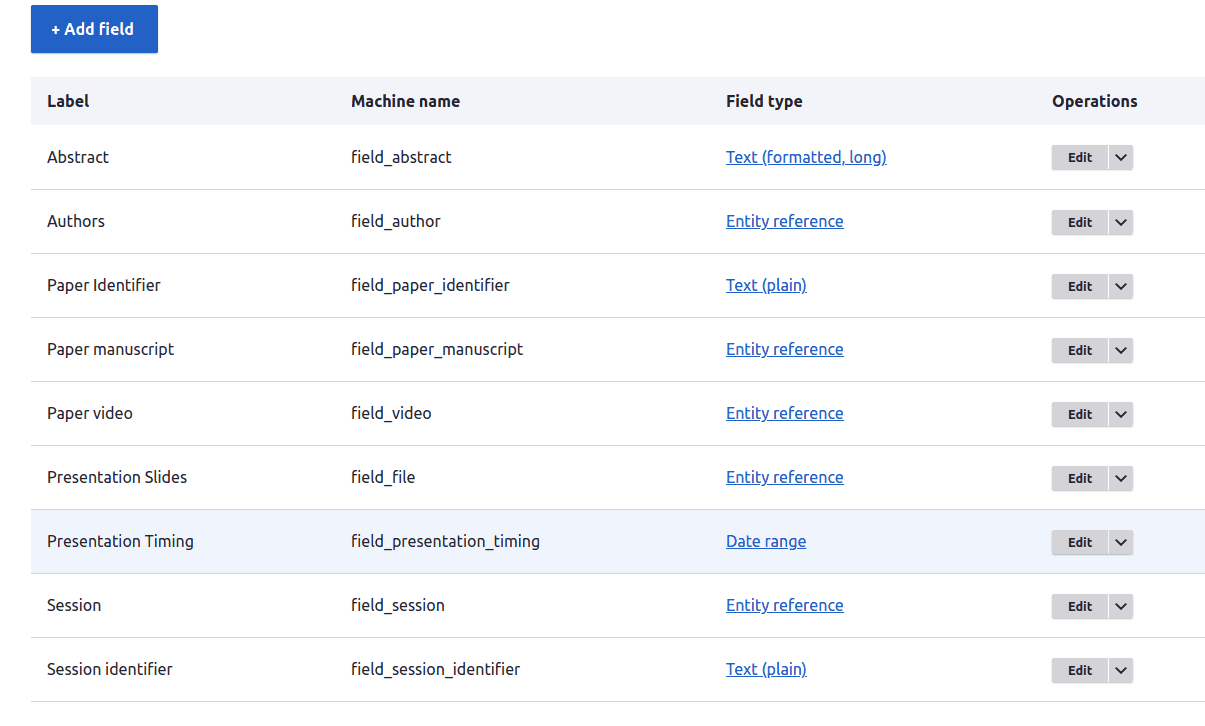

- id :对于每个yaml文件都是唯一的,并显示在迁移列表中。
- label :将包含迁移的描述。
- migration_group :这是包含所有迁移的主要组。
- source :将包含此迁移的所有源详细信息。
- urls :将包含用于迁移的文件。 在上面的代码中,源代码放在私有目录中。
- item_selector :项目选择器是获取整个数据集的路径。 基本上在这个标签里面应该有一组数据。
- fields :这里我们将标签值分配给一些变量。
- name :它给出了变量名。
- 标签:简短描述。
- selector :我们在其中告诉变量应该分配哪个标签值。
- ids :每个内容应该是唯一的。
- process :我们在其中映射变量和字段机器名称。
- destination :我们在其中提到数据应迁移到的实体名称。
根据您的数据,您现在也可以编写用于迁移的插件。 上面的代码插件是为field_author字段编写的。
在此之后转到Structure ,您将在那里看到Migration - 单击它。 您现在可以看到所有迁移组。
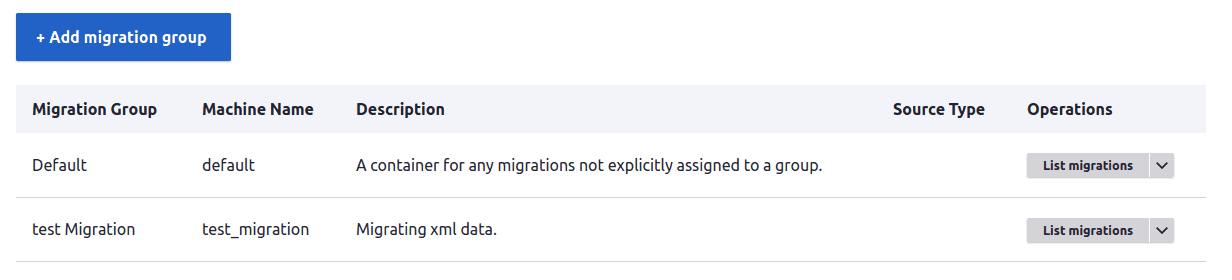
单击列表迁移。 在那里你可以看到我们创建的迁移yaml列表。

单击执行按钮。 您可以看到迁移选项。
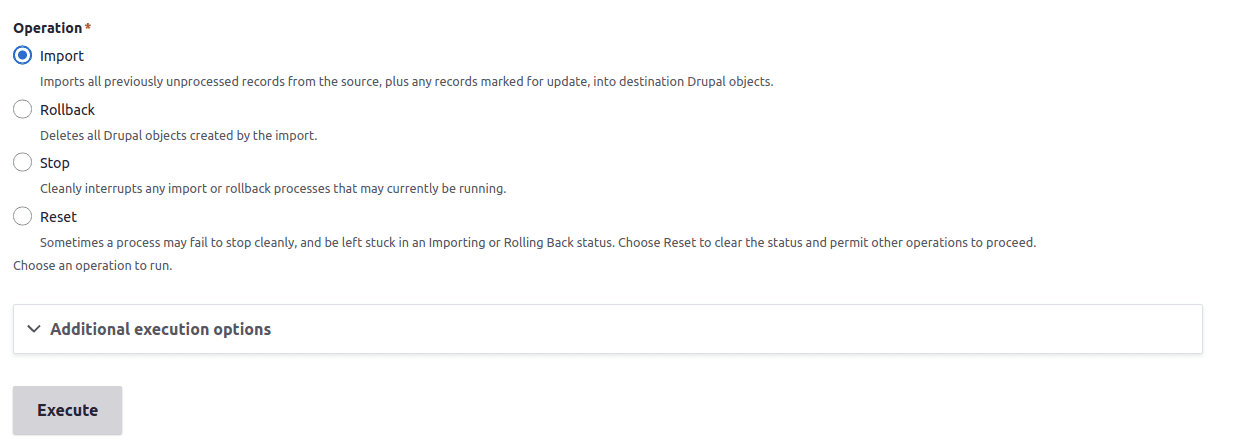
在这里你可以运行任何你想要的选项:
- 导入:这将迁移数据。
- 回滚:将回滚所有迁移的数据。
- 停止:将在过程中间停止迁移。
- 重置:将状态更改为空闲状态。
您还可以使用这些 drush 命令通过终端迁移内容。
- drush ms - 迁移状态
- drush mim <migration_id> - 迁移导入
- drush mr <migration_id> - 迁移回滚
- drush mrs <migration_id> - 使迁移状态空闲。