
UI-Form에 필드가 있는 Fieldset을 추가하는 쉬운 방법
게시 됨: 2016-08-23이 기사에서는 제품 편집 UI 양식에 필드가 있는 필드 세트를 추가하는 간단한 모듈을 만들 것입니다. 또한 제품을 저장하는 동안 이 데이터를 가로채는 관찰자를 만들 것입니다.
먼저 Vendor_Product 모듈을 생성해야 합니다.
1. app/code/Vendor/Product 디렉토리 생성
2. 다음 내용으로 app/code/Vendor/Product/registration.php 등록 파일을 만듭니다.
 <?php
    \Magento\Framework\Component\ComponentRegistrar::register(
        \Magento\Framework\Component\ComponentRegistrar::MODULE,
        '공급업체_제품',
        __디렉터리__
    );
    ?>
컴포저 파일 생성(모듈을 전송하려는 경우) app/code/Vendor/Module/composer.json :
 {
        "이름": "공급업체/모듈 제품",
        "설명": "해당 사항 없음",
        "유형": "magento2 모듈",
        "버전": "1.0.0",
        "라이센스": [
            "OSL-3.0",
            "AFL-3.0"
        ],
        "자동 로드": {
            "파일": [
                "등록.php"
            ],
            "psr-4": {
                "공급업체\\제품\\": ""
            }
        }
    }
이제 Magento_Catalog 모듈의 종속성을 사용하여 모듈의 기본 XML 파일 app/code/Vendor/Product/etc/module.xml을 만듭니다. 모달 창이 해당 형식에 추가되기 때문입니다.
 <?xml 버전="1.0"?>
    <config xmlns:xsi="https://www.w3.org/2001/XMLSchema-instance" xsi:noNamespaceSchemaLocation="urn:magento:framework:Module/etc/module.xsd">
        <모듈 이름="Vendor_Product" setup_version="1.0.0">
            <순서>
                <모듈 이름="Magento_Catalog"/>
            </순서>
        </모듈>
    </구성>
루트 Magento 디렉토리에 bin/magento module:enable Vendor_Product 및 bin/magento setup:upgrade를 입력하여 모듈을 활성화합니다.
그런 다음 모듈의 콘텐츠를 추가합니다. 추가할 UI 형식 메타데이터 및 가상 유형입니다.
app/code/Vendor/Product/etc/adminhtml/di.xml 파일을 만듭니다. 우리는 내부에 수정자를 배치할 것입니다:
 <?xml 버전="1.0"?>
<config xmlns:xsi="https://www.w3.org/2001/XMLSchema-instance" xsi:noNamespaceSchemaLocation="urn:magento:framework:ObjectManager/etc/config.xsd">
    <virtualType name="Magento\Catalog\Ui\DataProvider\Product\Form\Modifier\Pool">
        <인수>
            <argument name="modifiers" xsi:type="array">
                <item name="custom-fieldset" xsi:type="array">
                    <item name="class" xsi:type="string">Vendor\Product\Ui\DataProvider\Product\Form\Modifier\CustomFieldset</item>
                    <item name="sortOrder" xsi:type="number">10</item>
                </항목>
            </인수>
        </인수>
    </가상 유형>
</구성>
수정자는 데이터 추가 및 요소 및 UI 형식 구성 요소에 대한 일부 조작을 담당합니다. 수정자의 인터페이스에서 가져온 두 가지 주요 메서드가 있습니다(항상 표시되어야 함).
 <?php
    /**
     * Copyright 2016 마젠토. 판권 소유.
     * 라이선스에 대한 자세한 내용은 COPYING.txt를 참조하십시오.
     */
    네임스페이스 Magento\Ui\DataProvider\Modifier;

    /**
     * 클래스 수정자 인터페이스
     */
    인터페이스 수정자인터페이스
    {
        /**
         * @param 배열 $data
         * @return 배열
         */
        공개 함수 modifyData(배열 $data);

        /**
         * @param 배열 $meta
         * @return 배열
         */
        공개 함수 modifyMeta(배열 $meta);
    }
    ?>
이 예제에서는 modifyMeta 메서드를 사용할 것입니다. modifyData 메서드는 다음 기사에서 설명합니다.
이제 제품 편집 페이지에 대한 사용자 정의 필드 세트가 있는 수정자 파일(app/code/Vendor/Product/Ui/DataProvider/Product/Form/Modifier/CustomFieldset.php)을 만들고 필드로 채우십시오.
 <?php
네임스페이스 Vendor\Product\Ui\DataProvider\Product\Form\Modifier;

Magento\Catalog\Model\Locator\LocatorInterface를 사용하십시오.
Magento\Catalog\Ui\DataProvider\Product\Form\Modifier\AbstractModifier를 사용하십시오.
Magento\Framework\Stdlib\ArrayManager를 사용하십시오.
Magento\Framework\UrlInterface를 사용하십시오.
Magento\Ui\Component\Container를 사용하십시오.
Magento\Ui\Component\Form\Fieldset 사용;
Magento\Ui\Component\Form\Element\DataType\Number 사용;
Magento\Ui\Component\Form\Element\DataType\Text 사용;
Magento\Ui\Component\Form\Element\Input 사용;
Magento\Ui\Component\Form\Element\Select를 사용하십시오.
Magento\Ui\Component\Form\Element\MultiSelect 사용;
Magento\Ui\Component\Form\Field 사용;

클래스 CustomFieldset은 AbstractModifier를 확장합니다.
{

    // 컴포넌트 인덱스
    const CUSTOM_FIELDSET_INDEX = '커스텀_필드셋';
    const CUSTOM_FIELDSET_CONTENT = '맞춤_필드세트_콘텐츠';
    const CONTAINER_HEADER_NAME = 'custom_fieldset_content_header';

    // 필드 이름
    const FIELD_NAME_TEXT = '예시_텍스트_필드';
    const FIELD_NAME_SELECT = 'example_select_field';
    const FIELD_NAME_MULTISELECT = 'example_multiselect_field';

    /**
     * @var \Magento\Catalog\Model\Locator\LocatorInterface
     */
    보호된 $locator;

    /**
     * @var 어레이매니저
     */
    보호된 $arrayManager;

    /**
     * @var URL인터페이스
     */
    보호된 $urlBuilder;

    /**
     * @var 배열
     */
    보호된 $메타 = [];

    /**
     * @param LocatorInterface $locator
     * @param ArrayManager $arrayManager
     * @param UrlInterface $urlBuilder
     */
    공개 함수 __construct(
        로케이터 인터페이스 $ 로케이터,
        어레이매니저 $배열매니저,
        URL 인터페이스 $urlBuilder
    ) {
        $this->locator = $locator;
        $this->arrayManager = $arrayManager;
        $this->urlBuilder = $urlBuilder;
    }

    /**
     * 데이터 수정자는 이 예에서 아무 작업도 수행하지 않습니다.
     *
     * @param 배열 $data
     * @return 배열
     */
    공개 함수 modifyData(배열 $data)
    {
        $ 데이터 반환;
    }

    /**
     * 메타 데이터 수정자: 필드 세트 추가
     *
     * @param 배열 $meta
     * @return 배열
     */
    공개 함수 modifyMeta(배열 $meta)
    {
        $this->meta = $meta;
        $this->addCustomFieldset();

        $this->메타를 반환합니다.
    }

    /**
     * 기존 메타 데이터를 우리의 메타 데이터와 병합합니다(덮어쓰지 마십시오!)
     *
     * @반환 무효
     */
    보호된 함수 addCustomFieldset()
    {
        $this->meta = array_merge_recursive(
            $this->메타,
            [
                static::CUSTOM_FIELDSET_INDEX => $this->getFieldsetConfig(),
            ]
        );
    }

    /**
     * 우리의 fieldset 구성을 선언하십시오
     *
     * @return 배열
     */
    보호된 함수 getFieldsetConfig()
    {
        반품 [
            '인수' => [
                '데이터' => [
                    '구성' => [
                        '레이블' => __('필드셋 제목'),
                        'componentType' => Fieldset::NAME,
                        'dataScope' => static::DATA_SCOPE_PRODUCT, // 제품 데이터에 데이터 저장
                        '제공자' => static::DATA_SCOPE_PRODUCT . '_data_source',
                        'ns' => 정적::FORM_NAME,
                        '축소 가능' => 사실,
                        '정렬 순서' => 10,
                        '열림' => 사실,
                    ],
                ],
            ],
            '아이들' => [
                static::CONTAINER_HEADER_NAME => $this->getHeaderContainerConfig(10),
                static::FIELD_NAME_TEXT => $this->getTextFieldConfig(20),
                static::FIELD_NAME_SELECT => $this->getSelectFieldConfig(30),
                static::FIELD_NAME_MULTISELECT => $this->getMultiSelectFieldConfig(40),
            ],
        ];
    }

    /**
     * 헤더 컨테이너에 대한 구성 가져오기
     *
     * @param int $sortOrder
     * @return 배열
     */
    보호된 함수 getHeaderContainerConfig($sortOrder)
    {
        반품 [
            '인수' => [
                '데이터' => [
                    '구성' => [
                        '레이블' => null,
                        'formElement' => 컨테이너::이름,
                        'componentType' => 컨테이너::이름,
                        '템플릿' => 'ui/form/components/complex',
                        'sortOrder' => $sortOrder,
                        'content' => __('여기에 아무 텍스트나 쓸 수 있습니다.'),
                    ],
                ],
            ],
            '어린이' => [],
        ];
    }

    /**
     * 예제 텍스트 필드 구성
     *
     * @param $sortOrder
     * @return 배열
     */
    보호된 함수 getTextFieldConfig($sortOrder)
    {
        반품 [
            '인수' => [
                '데이터' => [
                    '구성' => [
                        'label' => __('예제 텍스트 필드'),
                        'formElement' => 필드::이름,
                        'componentType' => 입력::이름,
                        'dataScope' => 정적::FIELD_NAME_TEXT,
                        'dataType' => 번호::이름,
                        'sortOrder' => $sortOrder,
                    ],
                ],
            ],
        ];
    }

    /**
     * 선택 필드 구성의 예
     *
     * @param $sortOrder
     * @return 배열
     */
    보호된 함수 getSelectFieldConfig($sortOrder)
    {
        반품 [
            '인수' => [
                '데이터' => [
                    '구성' => [
                        'label' => __('옵션 선택'),
                        'componentType' => 필드::이름,
                        'formElement' => 선택::이름,
                        'dataScope' => 정적::FIELD_NAME_SELECT,
                        'dataType' => 텍스트::이름,
                        'sortOrder' => $sortOrder,
                        '옵션' => $this->_getOptions(),
                        '보이는' => 사실,
                        '비활성화' => 거짓,
                    ],
                ],
            ],
        ];
    }

    /**
     * 다중 선택 필드 구성의 예
     *
     * @param $sortOrder
     * @return 배열
     */
    보호된 함수 getMultiSelectFieldConfig($sortOrder)
    {
        반품 [
            '인수' => [
                '데이터' => [
                    '구성' => [
                        'label' => __('옵션 다중 선택'),
                        'componentType' => 필드::이름,
                        'formElement' => 다중 선택::이름,
                        'dataScope' => 정적::FIELD_NAME_MULTISELECT,
                        'dataType' => 텍스트::이름,
                        'sortOrder' => $sortOrder,
                        '옵션' => $this->_getOptions(),
                        '보이는' => 사실,
                        '비활성화' => 거짓,
                    ],
                ],
            ],
        ];
    }

    /**
     * 예제 옵션을 옵션 배열로 가져오기:
     * [
     * 레이블 => 문자열,
     * 값 => option_id
     * ]
     *
     * @return 배열
     */
    보호된 함수 _getOptions()
    {
        $옵션 = [
            1 => [
                '레이블' => __('옵션 1'),
                '값' => 1
            ],
            2 => [
                '레이블' => __('옵션 2'),
                '값' => 2
            ],
            3 => [
                '레이블' => __('옵션 3'),
                '값' => 3
            ],
        ];

        $options를 반환합니다.
    }
}
?>
이 예에서는 기존 UI 형식 메타 데이터를 가져와 새 데이터와 병합(다시 작성하지 않음!)해야 합니다.

 <?php
/**
 * 기존 메타 데이터를 우리의 메타 데이터와 병합합니다(덮어쓰지 마십시오!)
 *
 * @반환 무효
 */
보호된 함수 addCustomFieldset()
{
    $this->meta = array_merge_recursive(
        $this->메타,
        [
            static::CUSTOM_FIELDSET_INDEX => $this->getFieldsetConfig(),
        ]
    );
}
?>
완료되면 getFieldsetConfig 메소드에 새 필드 세트를 추가합니다.
 <?php
/**
 * 우리의 fieldset 구성을 선언하십시오
 *
 * @return 배열
 */
보호된 함수 getFieldsetConfig()
{
    반품 [
        '인수' => [
            '데이터' => [
                '구성' => [
                    '레이블' => __('필드셋 제목'),
                    'componentType' => Fieldset::NAME,
                    'dataScope' => static::DATA_SCOPE_PRODUCT, // 제품 데이터에 데이터 저장
                    '제공자' => static::DATA_SCOPE_PRODUCT . '_data_source',
                    'ns' => 정적::FORM_NAME,
                    '축소 가능' => 사실,
                    '정렬 순서' => 10,
                    '열림' => 사실,
                ],
            ],
        ],
        '아이들' => [
            static::CONTAINER_HEADER_NAME => $this->getHeaderContainerConfig(10),
            static::FIELD_NAME_TEXT => $this->getTextFieldConfig(20),
            static::FIELD_NAME_SELECT => $this->getSelectFieldConfig(30),
            static::FIELD_NAME_MULTISELECT => $this->getMultiSelectFieldConfig(40),
        ],
    ];
}
?>
추상 제품 UI 형식 수정자에서 상속하고 해당 네임스페이스와 데이터를 공급자로 사용합니다. 'provider' => static::DATA_SCOPE_PRODUCT . '_data_source'(여기서 DATA_SCOPE_PRODUCT는 'data.product' 라인임).
componentType 옵션은 주요 옵션 중 하나이며 구성 요소 유형을 담당합니다. 접을 수 있는 옵션은 필드 집합을 접고 확장하는 역할을 합니다. 그리고 열기 옵션은 양식을 그리는 동안 기본적으로 필드 세트를 열 것인지 여부를 정의합니다.
그런 다음 결과적으로 getHeaderContainerConfig 메소드의 필드 세트에 헤더를 추가하고 필드의 3가지 예(텍스트, 선택 및 다중 선택)를 추가합니다. 그러나 제품과 양식은 modifyData 메서드에 추가할 때까지 데이터를 수신하지 않습니다. 그러나 저장하는 동안 데이터를 전송하고 가로챌 수 있는 기능이 있습니다.
양식이 어떻게 보이는지 봅시다.
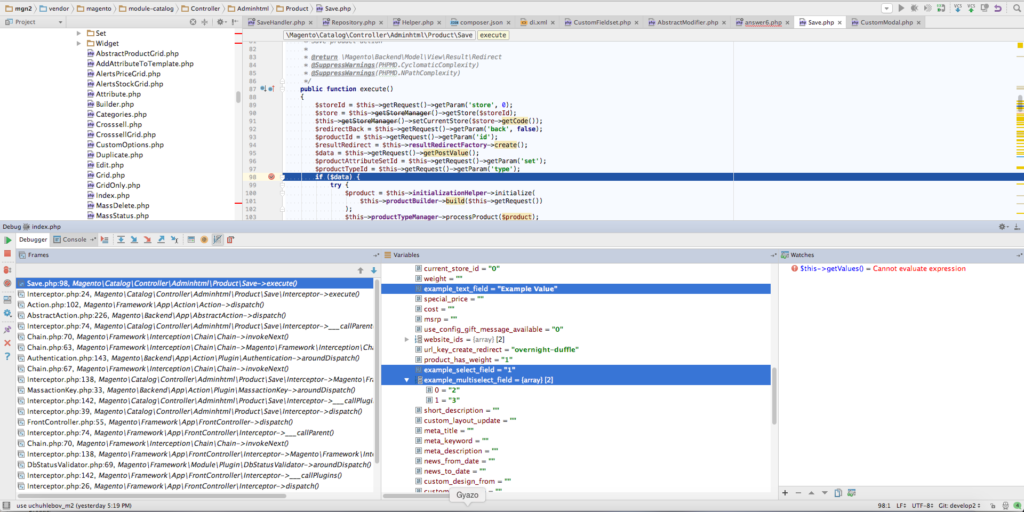
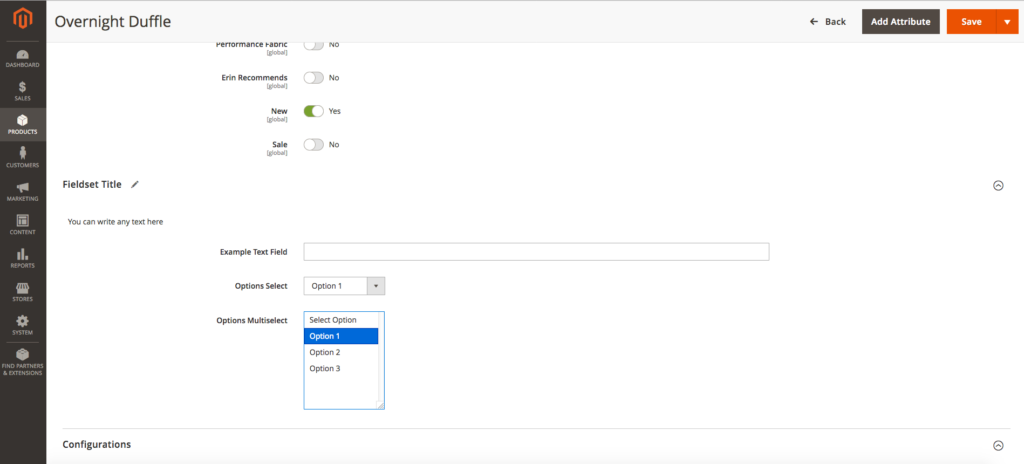 데이터 저장은 메인 실행 메소드의 제품 컨트롤러 파일 vendor/magento/module-catalog/Controller/Adminhtml/Product/Save.php 내에서 발생합니다. 모든 것이 올바른 방식으로 수행되면 이 메서드의 입력 데이터에 데이터가 올바르게 표시됩니다.
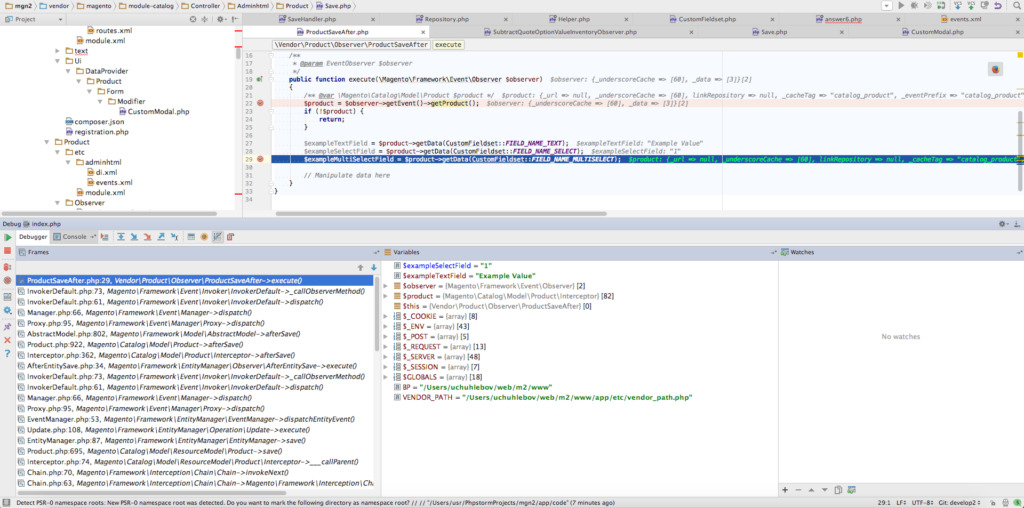
 제품에 처음부터 해당 속성이 없으면 수동으로 저장해야 합니다. 관찰자에서 이 작업을 수행할 수 있습니다.
먼저 app/code/Vendor/Product/etc/adminhtml/events.xml 파일에서 선언합니다(프론트 엔드에 양식이 없기 때문에 adminhtml 범위를 사용합니다).
 <?xml 버전="1.0"?>
<config xmlns:xsi="https://www.w3.org/2001/XMLSchema-instance" xsi:noNamespaceSchemaLocation="urn:magento:framework:Event/etc/events.xsd">
    <이벤트 이름="catalog_product_save_after">
        <관찰자 이름="save_example_data" instance="Vendor\Product\Observer\ProductSaveAfter" />
    </이벤트>
</구성>
그런 다음 instance 속성에서 가리킨 관찰자의 클래스를 만듭니다. app/code/Vendor/Product/Observer/ProductSaveAfter.php:
 <?php
네임스페이스 Vendor\Product\Observer;

\Magento\Framework\Event\ObserverInterface를 사용하십시오.
\Magento\Framework\Event\Observer를 EventObserver로 사용하십시오.
Vendor\Product\Ui\DataProvider\Product\Form\Modifier\CustomFieldset 사용;

ProductSaveAfter 클래스는 ObserverInterface를 구현합니다.
{

    /**
     * @param EventObserver $옵저버
     */
    공개 함수 실행(\Magento\Framework\Event\Observer $observer)
    {
        /** @var \Magento\Catalog\Model\Product $product */
        $product = $observer->getEvent()->getProduct();
        if (!$product) {
            반품;
        }

        $exampleTextField = $product->getData(CustomFieldset::FIELD_NAME_TEXT);
        $exampleSelectField = $product->getData(CustomFieldset::FIELD_NAME_SELECT);
        $exampleMultiSelectField = $product->getData(CustomFieldset::FIELD_NAME_MULTISELECT);

        // 여기에서 데이터 조작
    }
}
?>
관찰자의 데이터:
이제 관찰자로부터 자신의 모델을 호출하고 데이터를 저장하거나 원하는 대로 수정할 수 있습니다.
조심하세요! 모델 저장이 제품 저장과 연결되면 재귀로 이어질 수 있습니다.